Great Job

Mustang Australia

Author Topic: Great Job  (Read 31972 times)

Offline Shermatt

  • Top Streeter
  • ******
  • Posts: 3529
Great Job
« on: March 25, 2011, 11:04:21 pm »
This story takes place in a dark lit building in Florida where a 68 S code laid on its side suspended to a rotisserie for over 15-20 years

As some of you may know, I had a 1968 S code convertible sitting down at Sunstate mustangs workshop that I had intended on finishing off where the previous owner left it.


The car was bought out of Ft Lauderdale (restored) and driven across Florida to Sherm’s workshop where it was decided that it could have been restored a lot better. Next thing you know, it’s a bare shell and slung up on the spinner

After the owner had given up on the exercise, it sat there until now. I knew of the car and checked it out every time I attended the building but never pulled the trigger until about 4 years ago. It then sat there for another 2 years until it was pried from my hands from a fella from Melbourne. AKA Chopper

A very convincing young lad he was and the force was strong in him but was also a very realistic jedi ninja on what I wanted to see done with the car. At the time I was helping build another car on a budget and told him that I wasn’t prepared to see it built the same way and told him that if you want me to restore it, that it would have to be done my way and in my time (1 year) and the main thing that sealed the deal was to be patient. Delivery time landed in Oz was estimated of September 2010

A price was laid out itemizing what he would be getting and what he wouldn’t along with a $6000 balloon that “could” be tapped into as we all know there’s always something not taken into account. I allowed $3000 of my time that I knew in advance wouldn’t cover the hours involved but at the time, I didn’t mind as it was still my car and I wanted it built a certain way.

With the work schedule I had, the old girl laid up for another 2 months until one day, I finally had a window of opportunity where we could get cracking on it. The car was moved from the dark abyss of Shermans workshop over to Oldsmar Florida (Oldsmar is named after Oldsmobile as it was the testing grounds for R.E. Olds and his cars)


The car was carefully loaded onto another rotisserie where it was decided to get it blasted in house and remove the entire floor pan and replace with new. A cost not expected but very well necessary.


The previous restoration mob had done a job that this car would never twist or buckle. That was the problem. Every seem to every panel that should have been spot welded had been welded with almost 1cm of what I call “spaghetti weld”. It was everywhere. One it looked horrible but two….It just looked horrible. It made the 1st day on the job very daunting as it wasn’t expected (like all projects) My $3000 quoted for labour was slowly being hacked into. Went through $100 of grinding wheels to attempt to clean it all up and 3 days of doiking around


Then it was back to me where it sat for another few weeks while I tried to find the time to get cracking on it. That just never happened. I had to finish off the Fatkids 500 and get it out of the way. Secondly, I wanted to get it ready for the Turkey Rod run up in Daytona. By the way, a 427 wins hands down over a 428. What a machine that thing was. Once finished, I only owned it for 2 days. Sold to a lawyer in Orlando.


With the new floor pan all done and all the spaghetti weld taken out of it, we now had a car with good bones to work with. There are still a few spots that I wish we could of rectified but they were of no real major concern. Whoever built the car, had used angle iron under the seam to the torque box rail and bent it into shape. That was cut out and linished back but still retains a 4mm space of redundant steel.

The exterior of the car was in fantastic shape and just needed to be re-assembled and get all the panels re- aligned so we could test fit all the panels before it went to paint. Something I had planned to do myself but good ol Chopper threw a spanner into the works and said the Fatkids most hated word…”metallic”. He had decided to that it should be painted to what the Marti report said along with the door tag. Lime green…blahhh!!!

More to follow

Matt

Offline Shermatt

  • Top Streeter
  • ******
  • Posts: 3529
Great Job
« Reply #1 on: March 26, 2011, 07:02:13 am »
Part 2

We finally found some time to get the car all refitted and all the panels aligned ready for paint.


Now it was time to prep the under chassis and clean up the 9 inch and give it a quick service while it was out.


The entire boot are had seem sealer that was as thick as, so we decided to strip the entire area and clean it up so once painted, it looked as it does on the outside. What a task that was but well worth it. (2 days of prep)


« Last Edit: August 05, 2012, 12:49:20 pm by peterp »

Offline jmd1

  • Blue Printed
  • ****
  • Posts: 1416
Great Job
« Reply #2 on: March 26, 2011, 09:59:32 pm »
Matt.
That must be the most photographed index finger on the planet.
I seem to have a shed load of pics of said crotch sorter from a year and a bit ago.
Trucks all good, am sorting rust repairs now, but it goes like a shower of.......

Offline Shermatt

  • Top Streeter
  • ******
  • Posts: 3529
Great Job
« Reply #3 on: March 26, 2011, 11:44:49 pm »
I liked that truck. Never got to drive it.

Keep on truckin  

:smile01:

Matt

Offline Shermatt

  • Top Streeter
  • ******
  • Posts: 3529
Great Job
« Reply #4 on: March 28, 2011, 01:56:16 am »
The seem sealer was so thick in the boot, we hit it with a wire wheel and a grinder. Wasnt even going to attempt to blast it as it was that thick. Would of been a pointless exercise. We grinded it all out and then re-sealed all the seems. Heres a few of what I have


We found a few humidity blisters on some of the panels along the way so we decided to strip it back to steel. Didnt want to waste our time painting over a problem that would definately come back. Back to steel we go!!


Heres a few pics of the body work after stripping some of the panels one by one.

All the panels are slowly lining up and test fitted every panel. Starting to come together now


This is as far as we got untill the fatkid had to get back to other things. I knew I was not going to have time to finish the rest for some months so I contacted a fella to finish the body work and shoot the car for me. (that came out of my pocket)

Off to paint we go


« Last Edit: August 05, 2012, 12:50:21 pm by peterp »

Offline Shermatt

  • Top Streeter
  • ******
  • Posts: 3529
Great Job
« Reply #5 on: March 30, 2011, 02:43:11 am »
PART  3....attach of the evil sith lord painter

The car was dropped to a fella that I knew years ago that actually helped me restore my first mustang when I moved here. He had opened up a shop 8 months back and as you know, I was looking for a decent painter.

Something that I have found very hard to find. If there not asking drug dealer prices for their work, their all on drugs and do lousy work. He had called out of the blue one day and sort of fell in my lap.

Car was dropped down to him and I explained what I wanted as a finished product. Mr Madden had agreed to pay $500 towards the paint as I would have had to pay another painter $500 to shoot it as it was metallic but I payed the rest. Something that I offered to do. $3000 that I quoted for labour is almost depleted now.

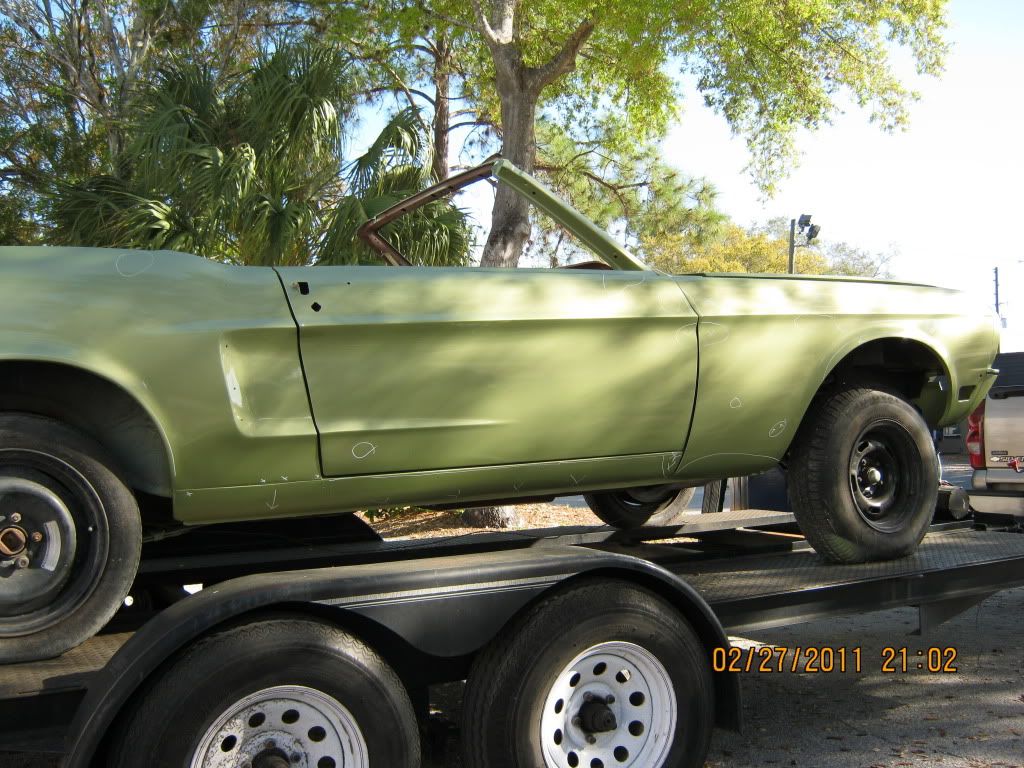
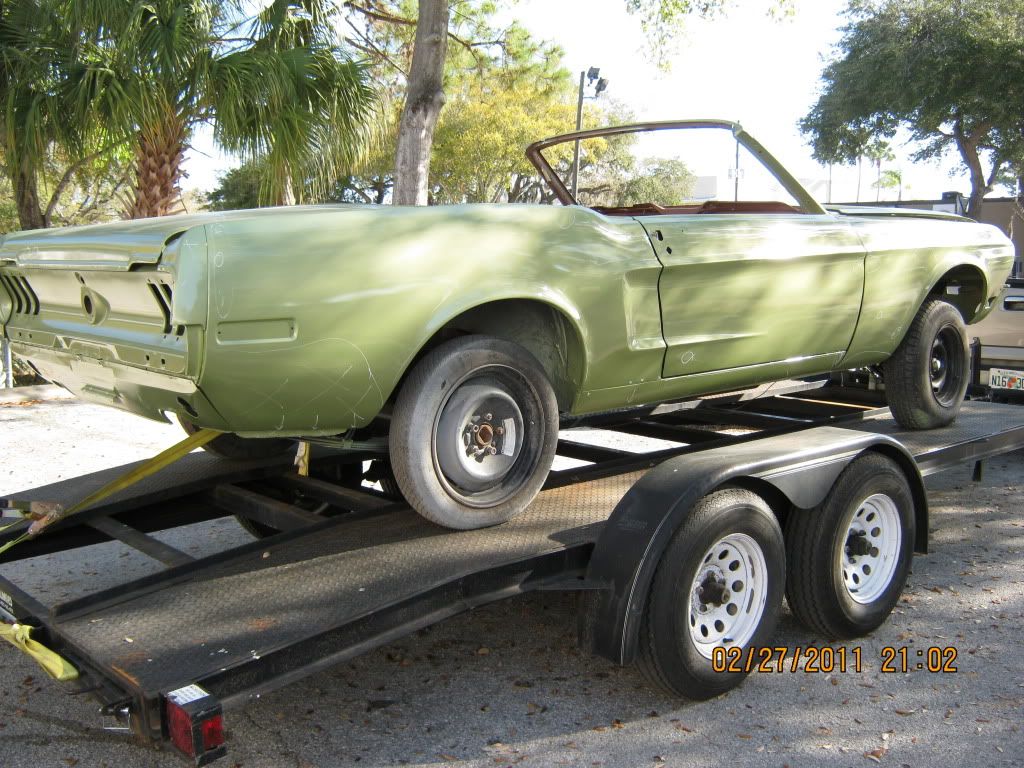
The painter called me and says that he has done all the inside of the car and he was ready to prep and shoot the outside. Being a little hesitant after all my dealing with painters, I sent Sheri down to get me some pics of the car. She returned with these.


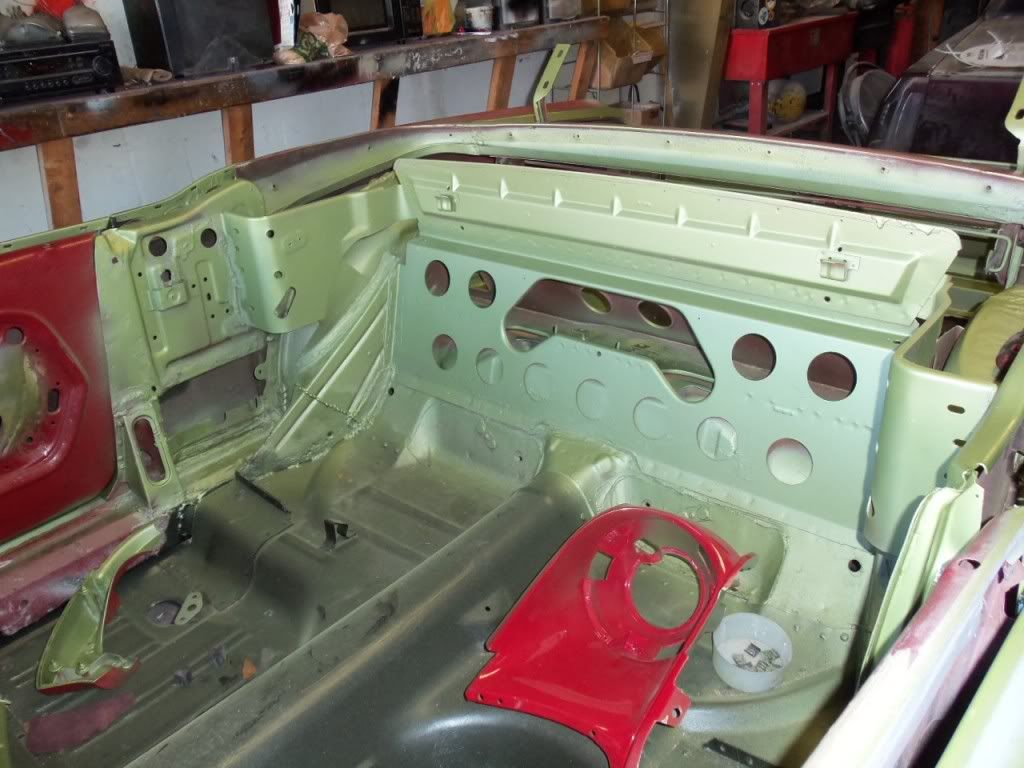
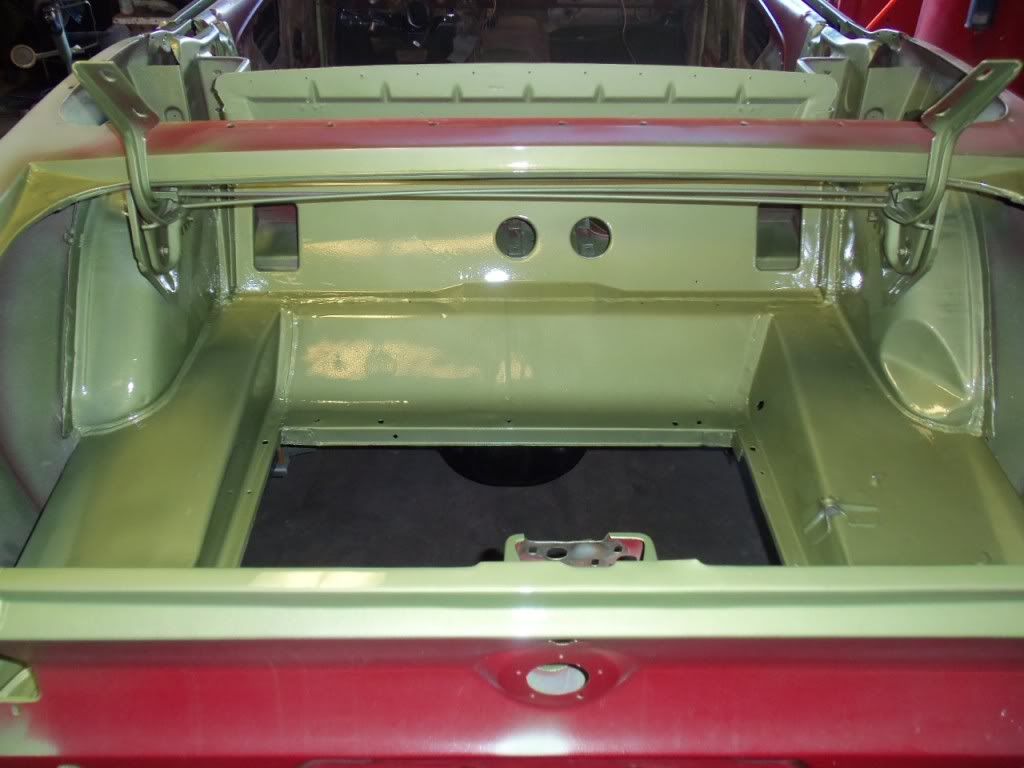
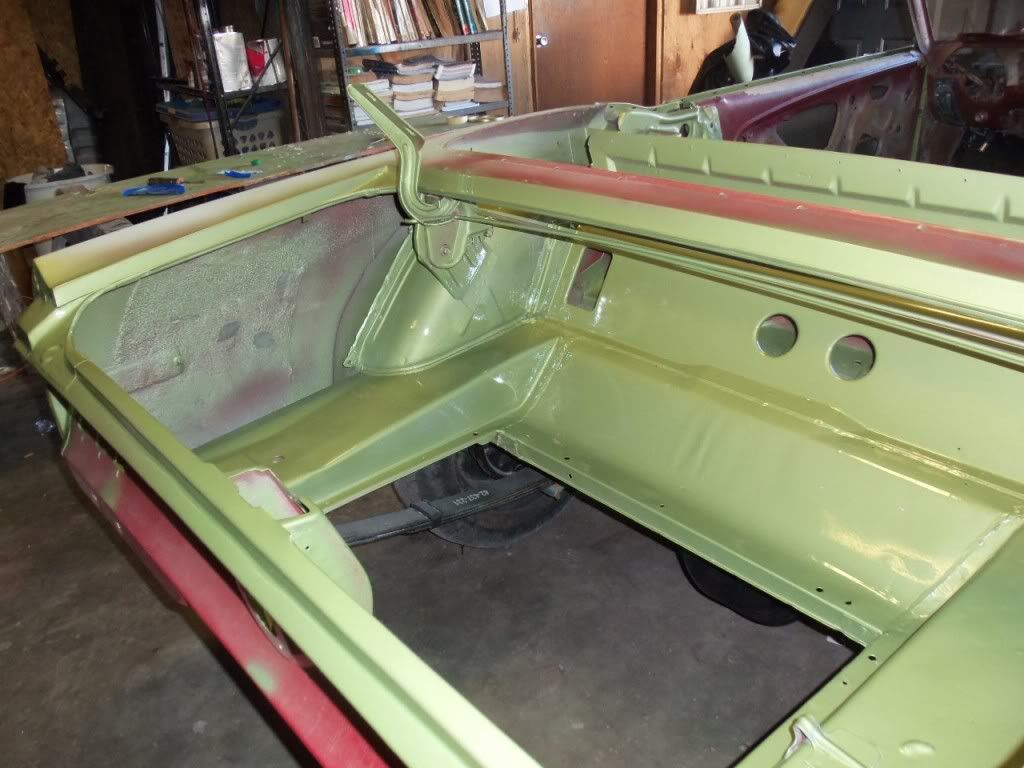
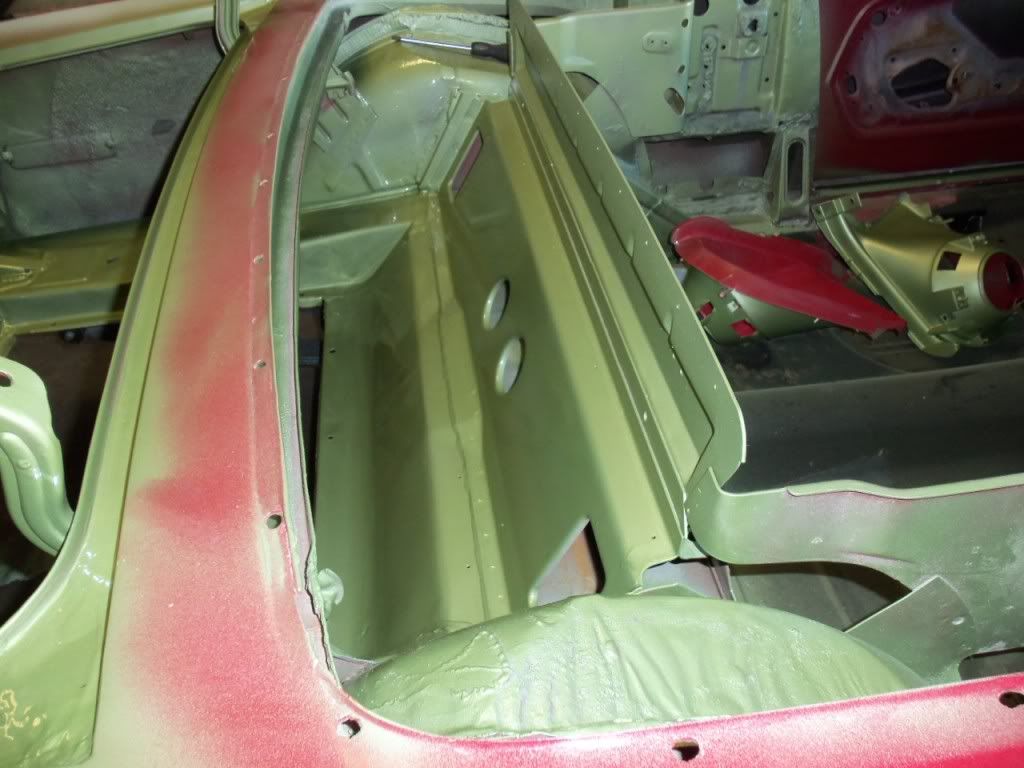
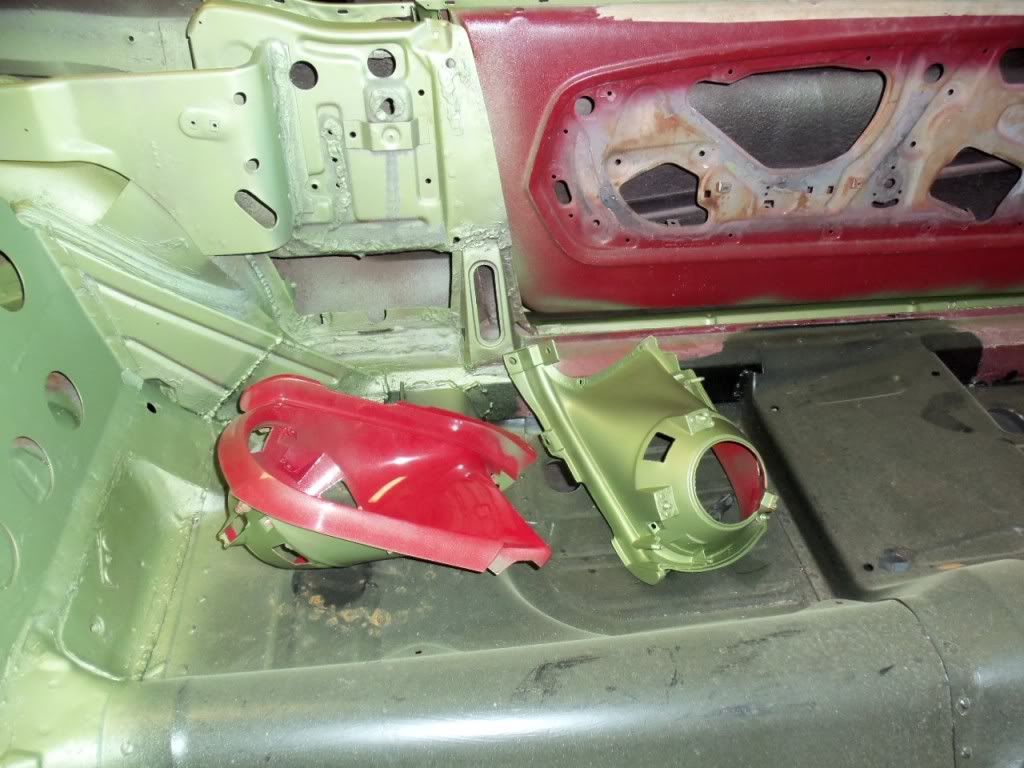
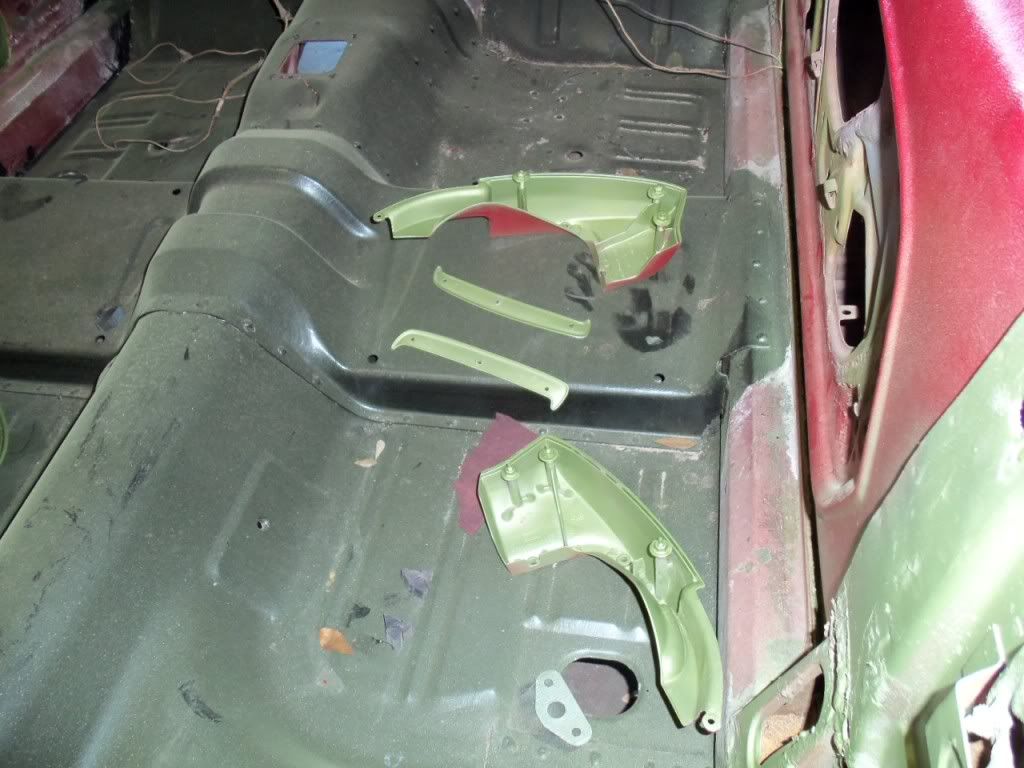
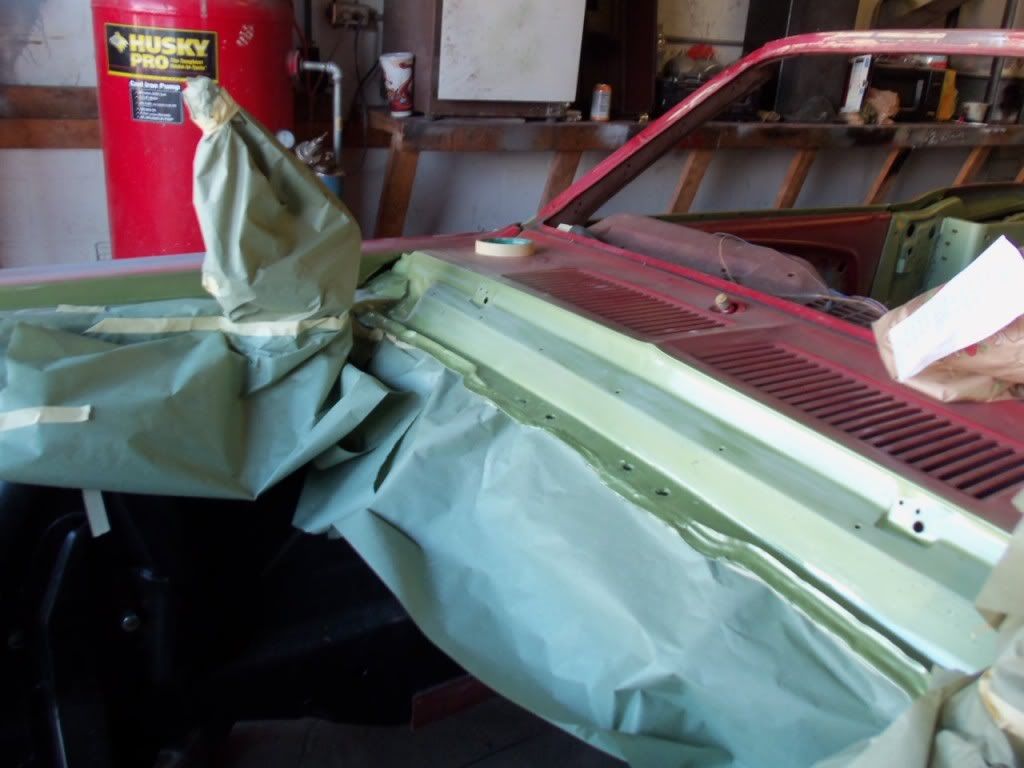
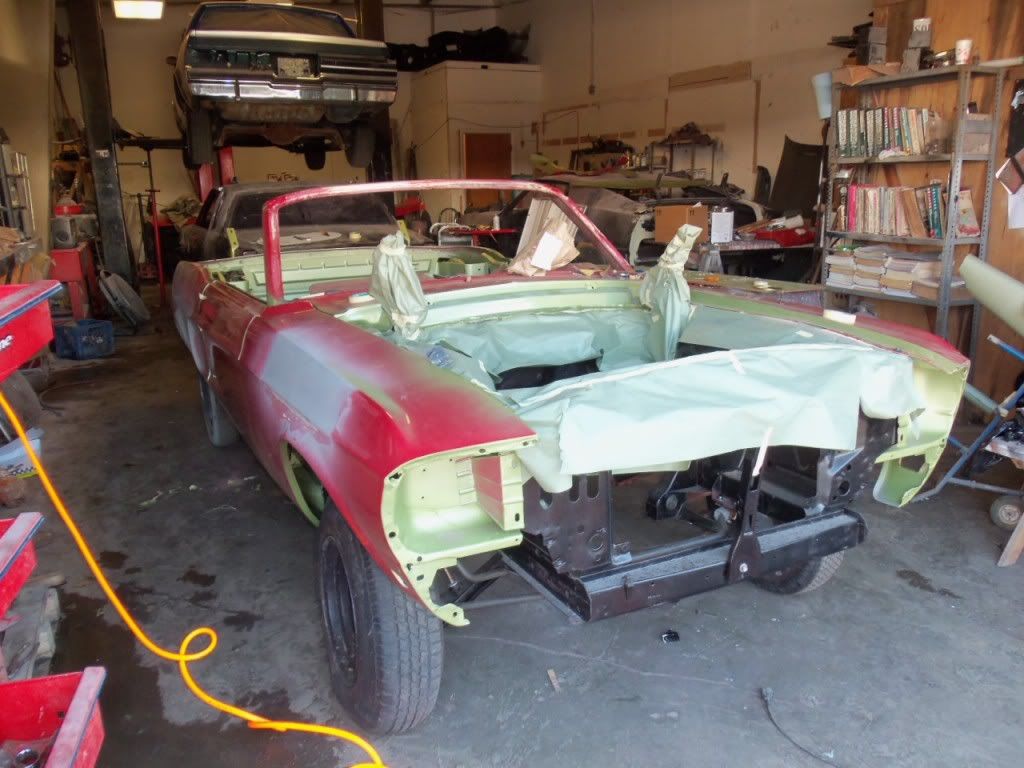
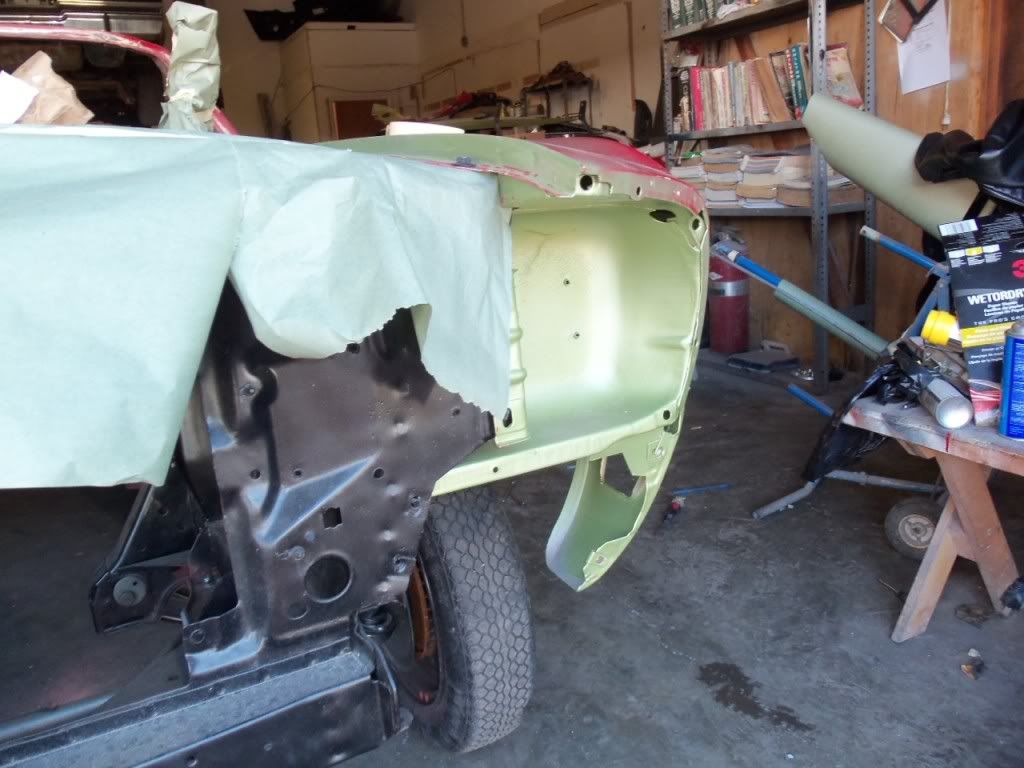
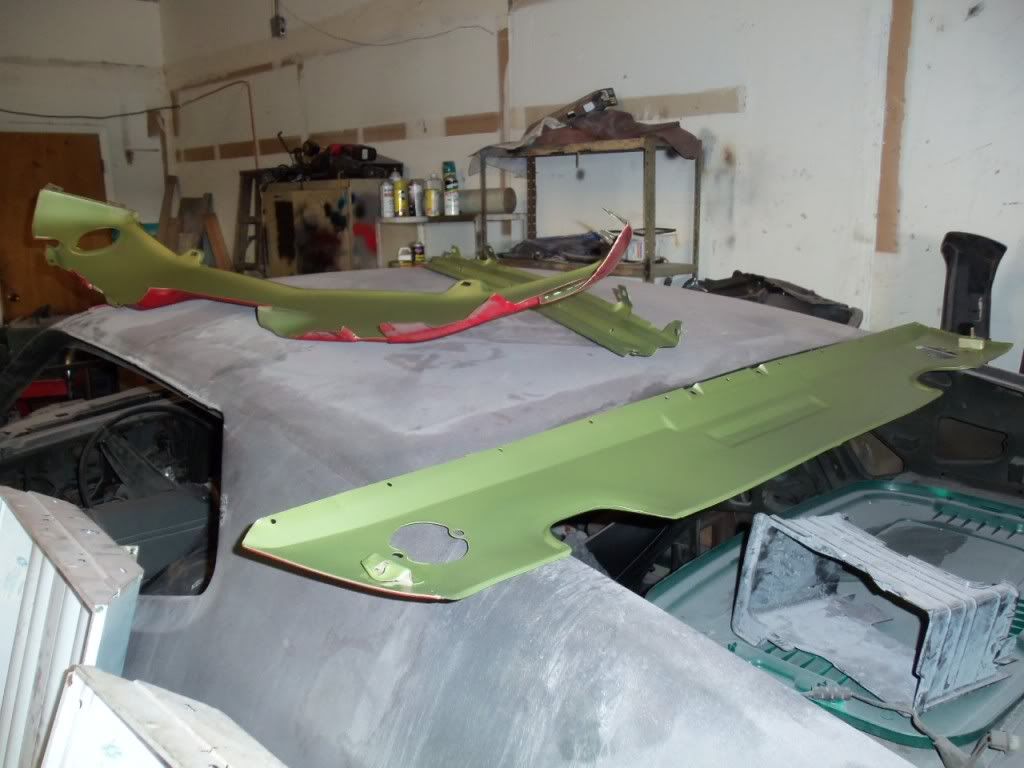
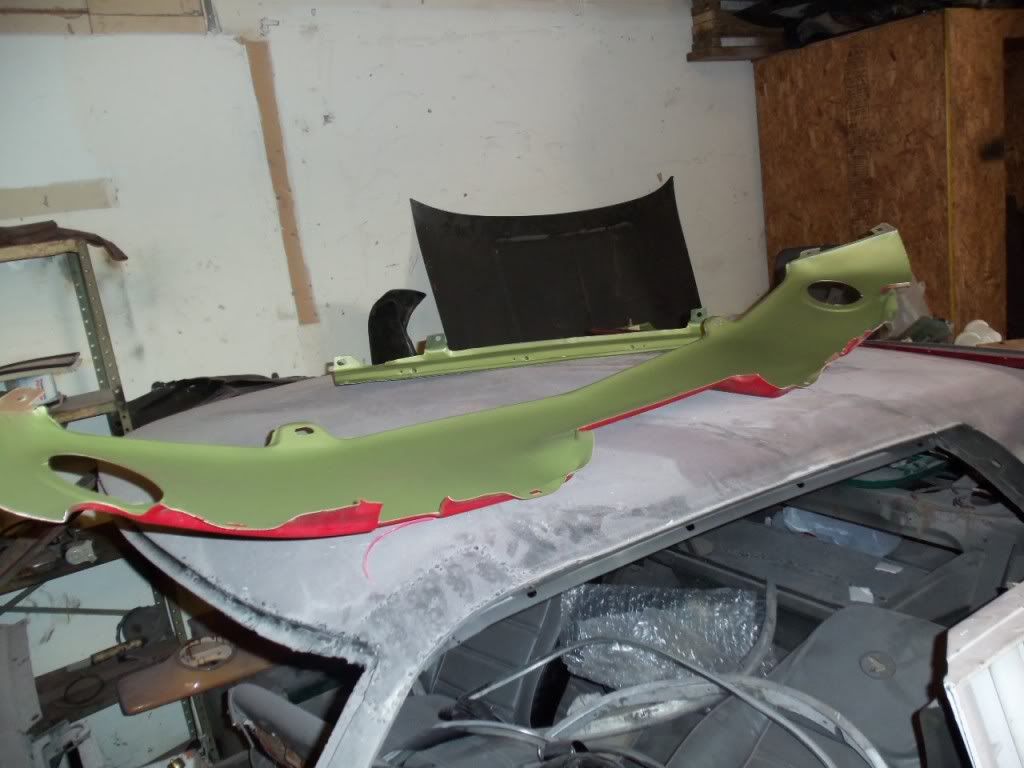
He went a little over board I thought but I suppose I did say “where ever you see red, I want Green” From the photos, I was quite happy to let him finish. He told me the whole thing would take 2-3 weeks and we were in week 2.
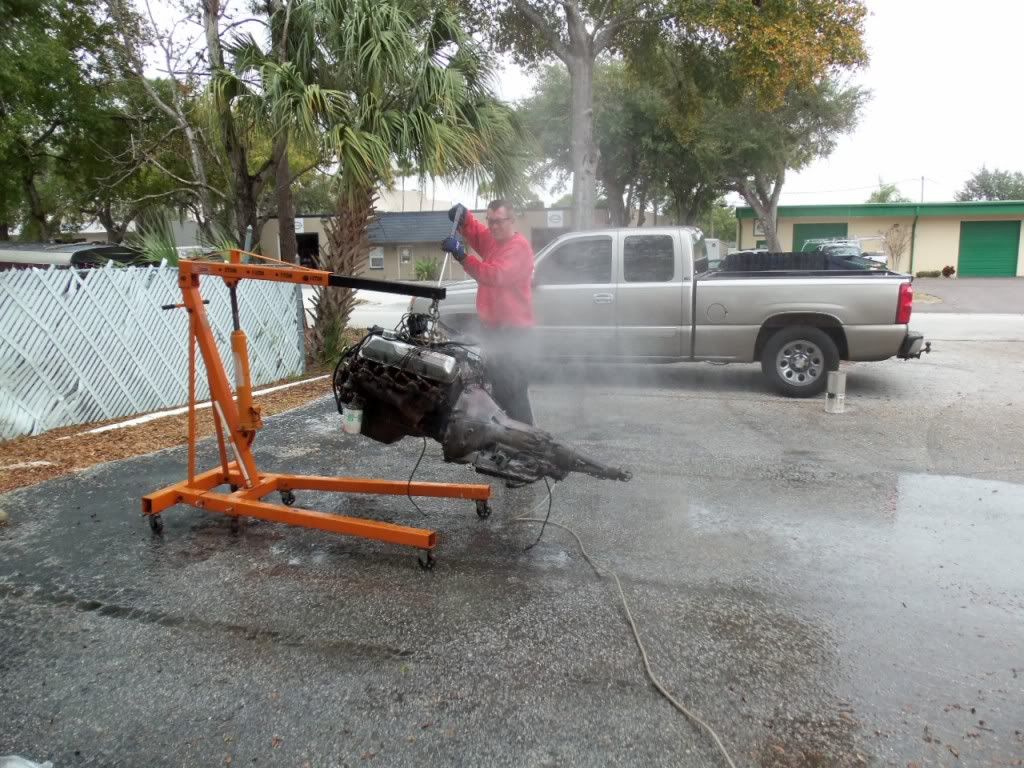
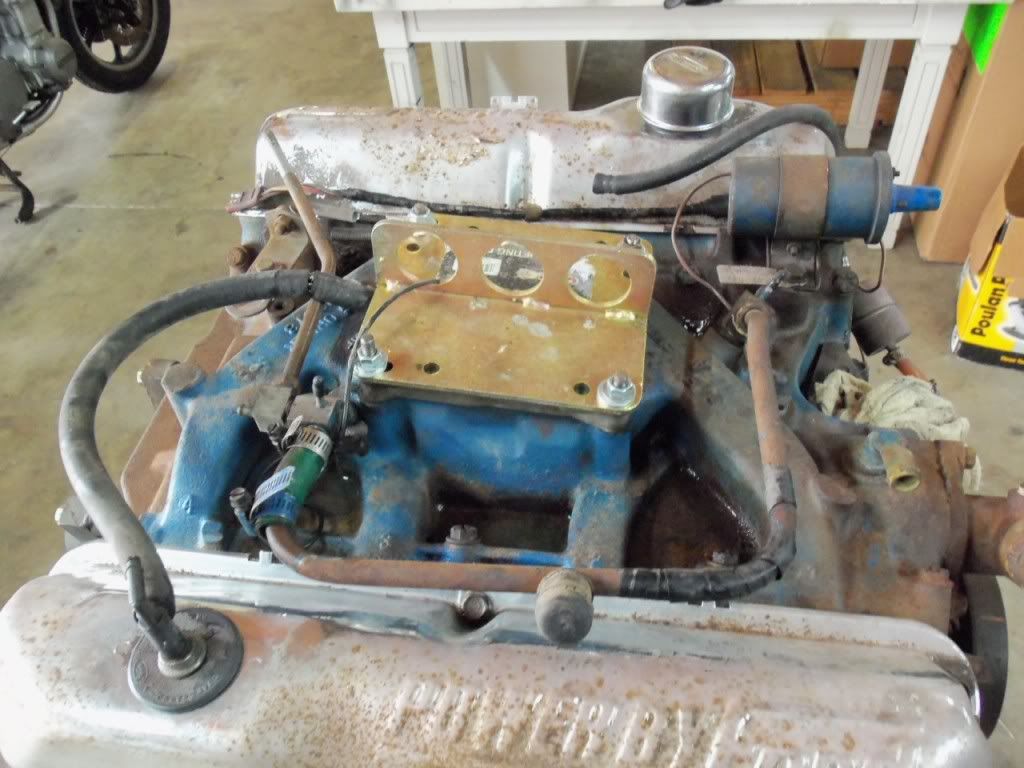
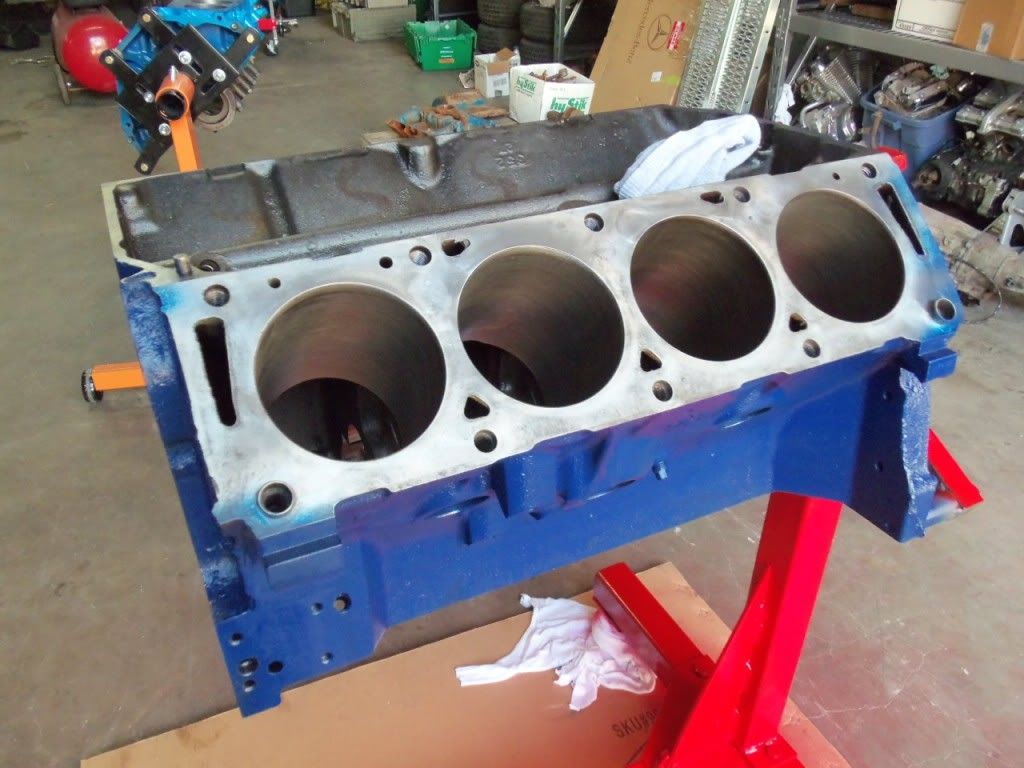
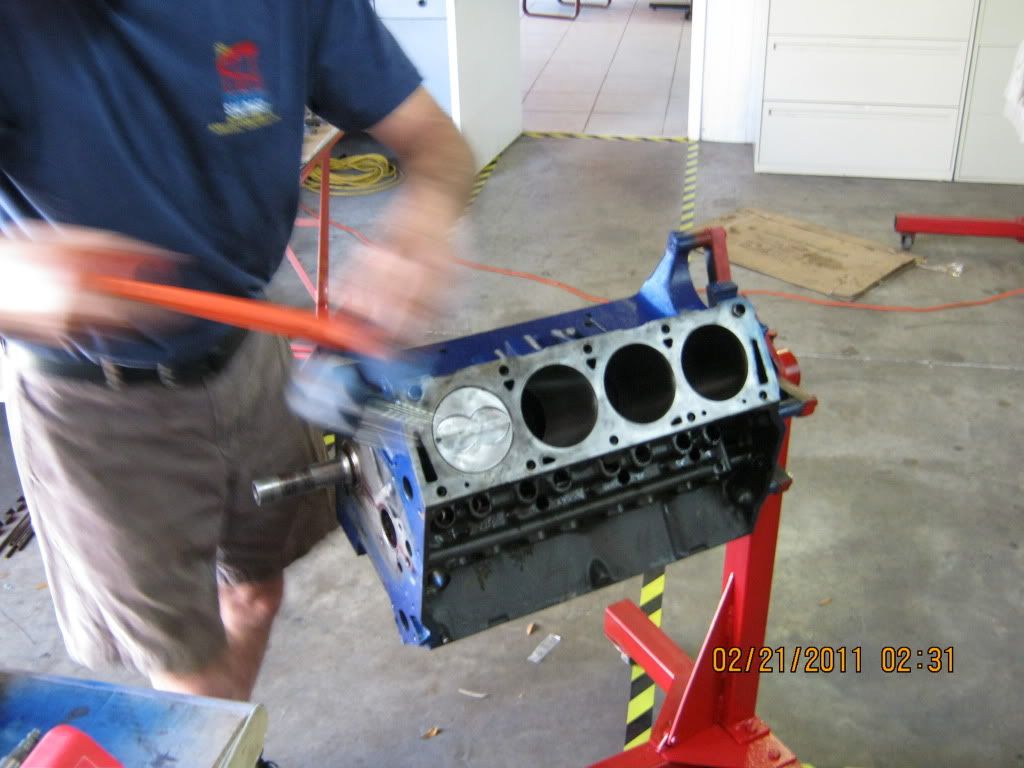
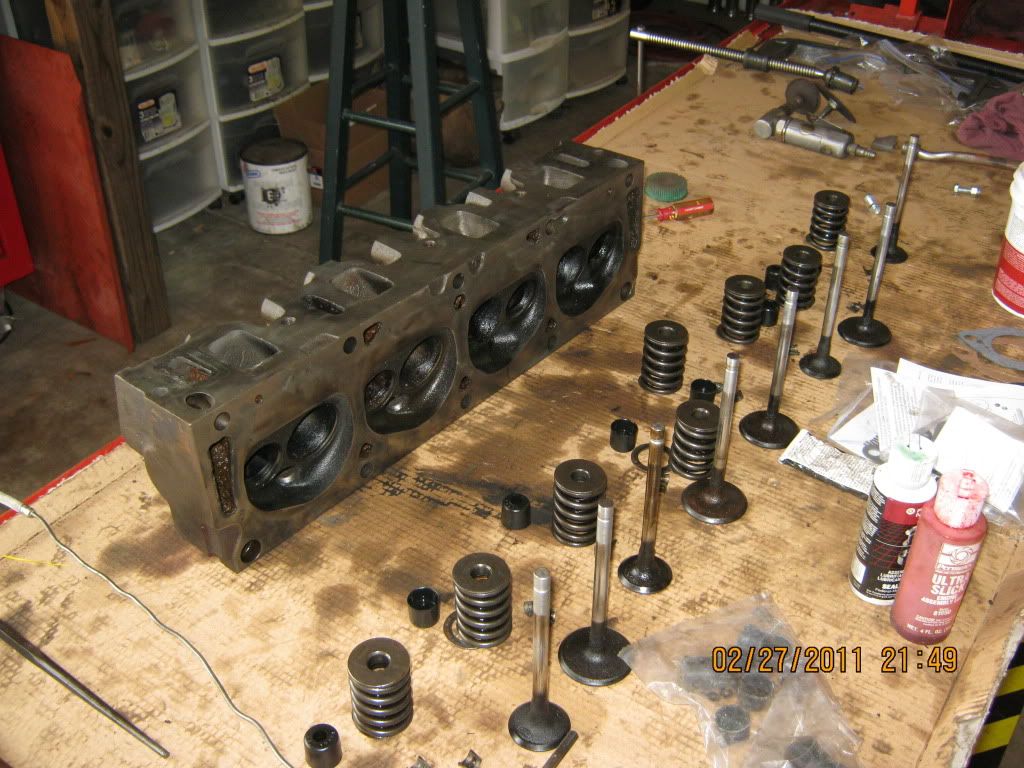
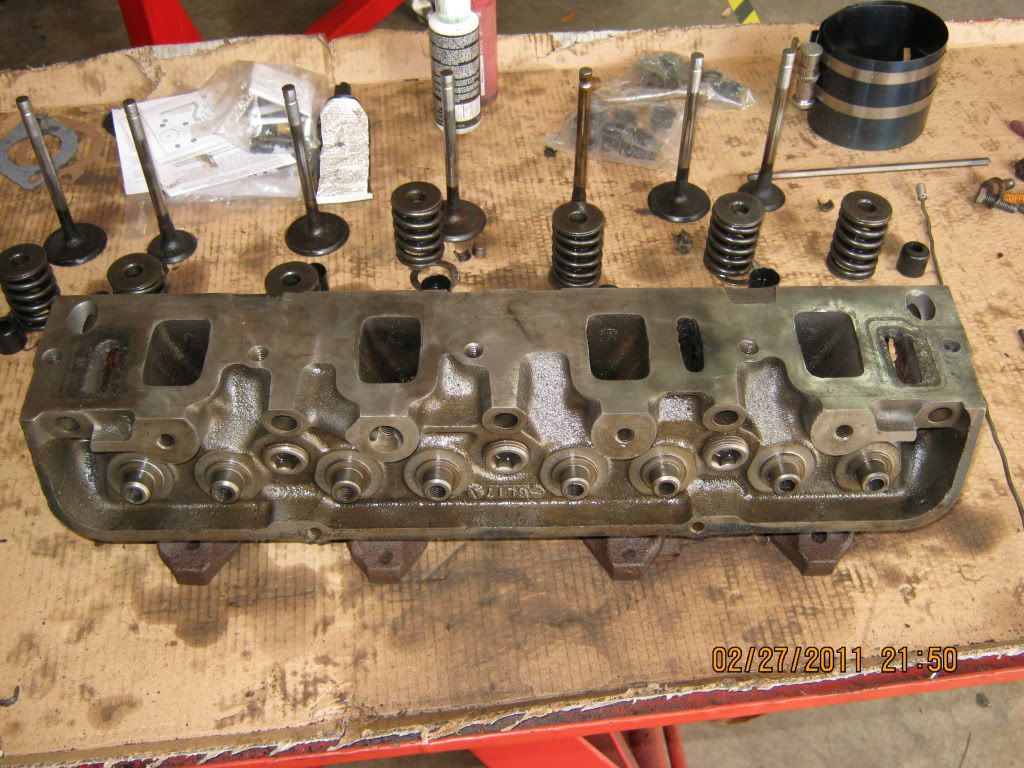
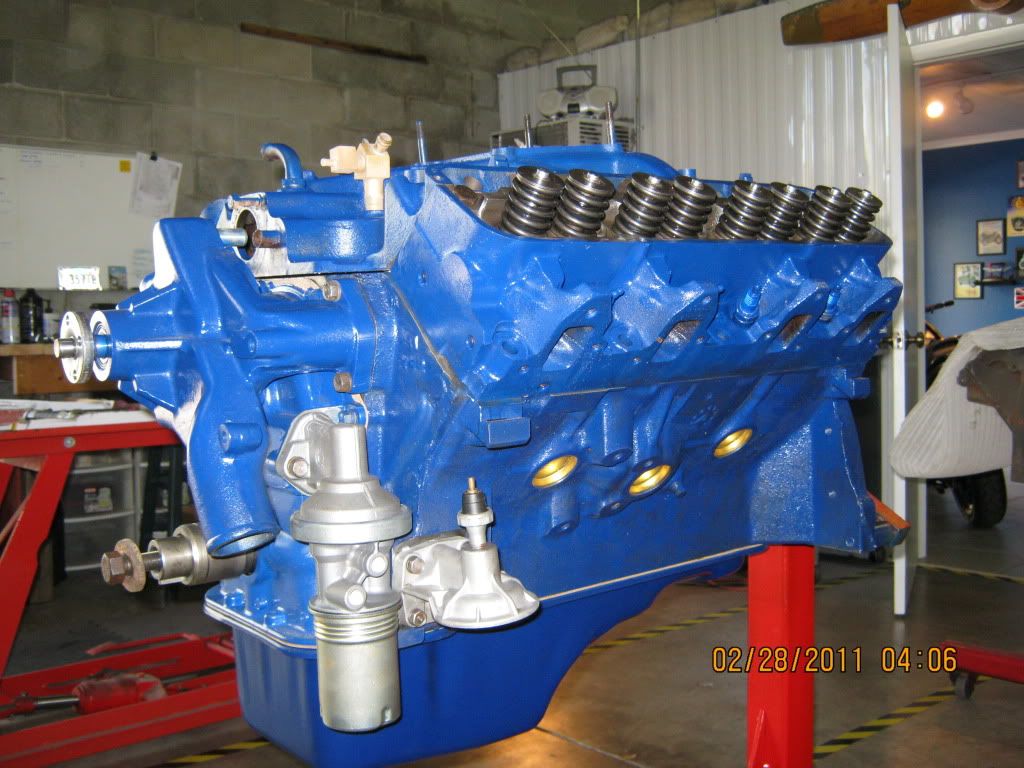
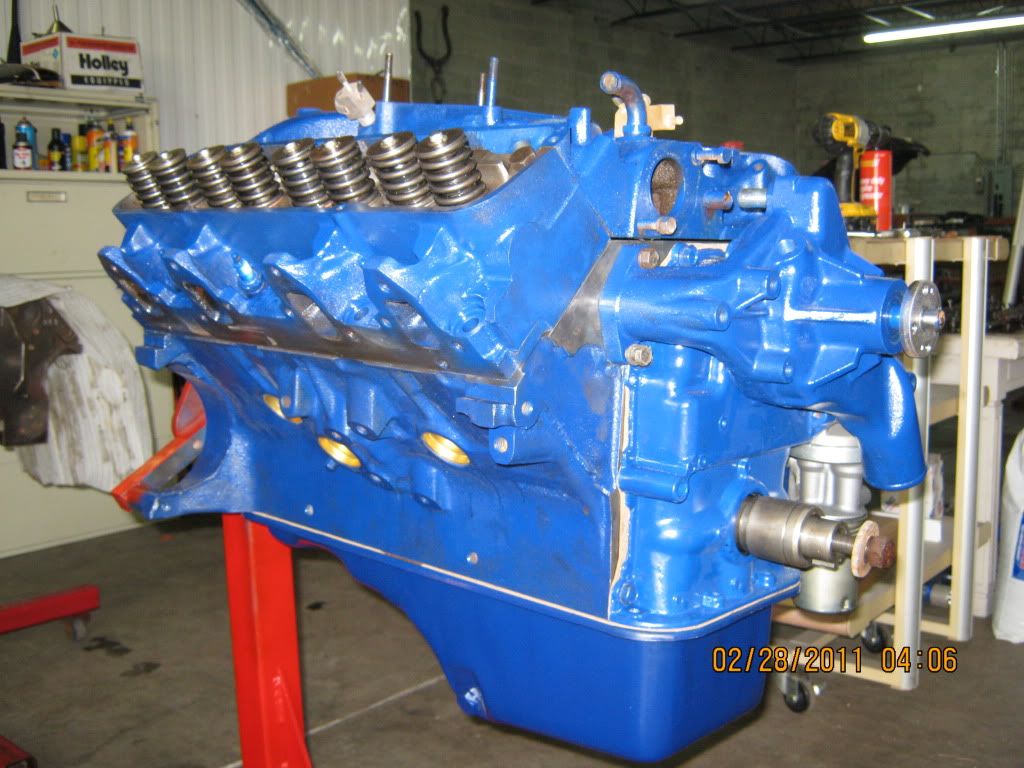
In the meantime, it was discussed to rebuild the engine and trans so Mike
got started on that.


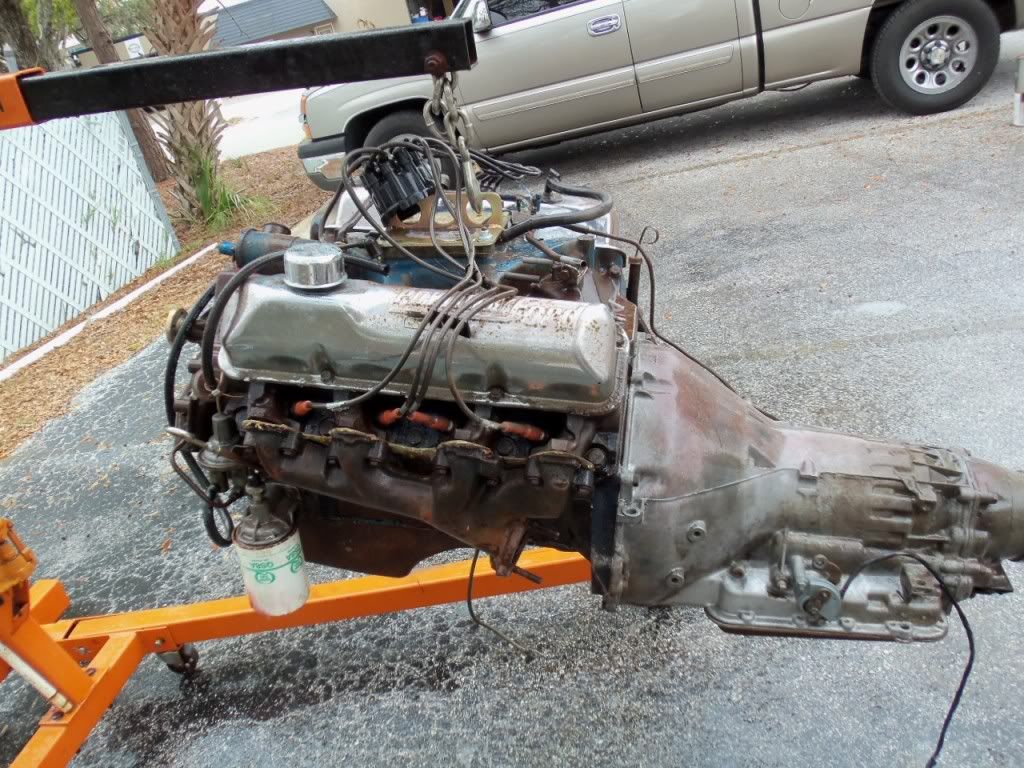
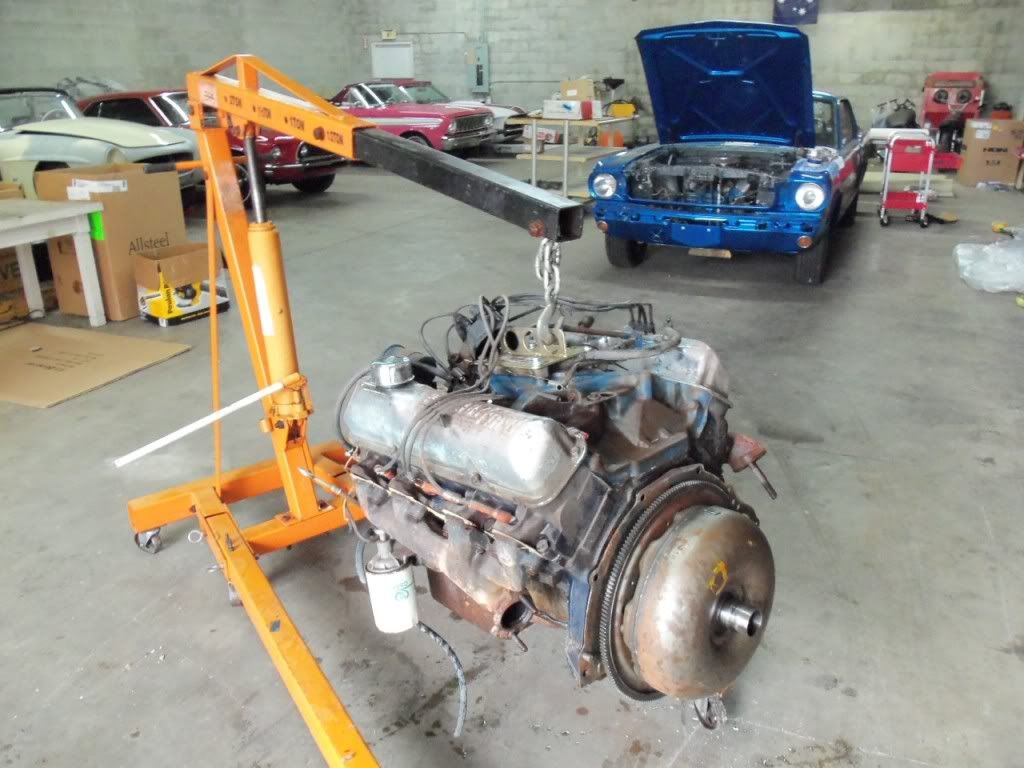
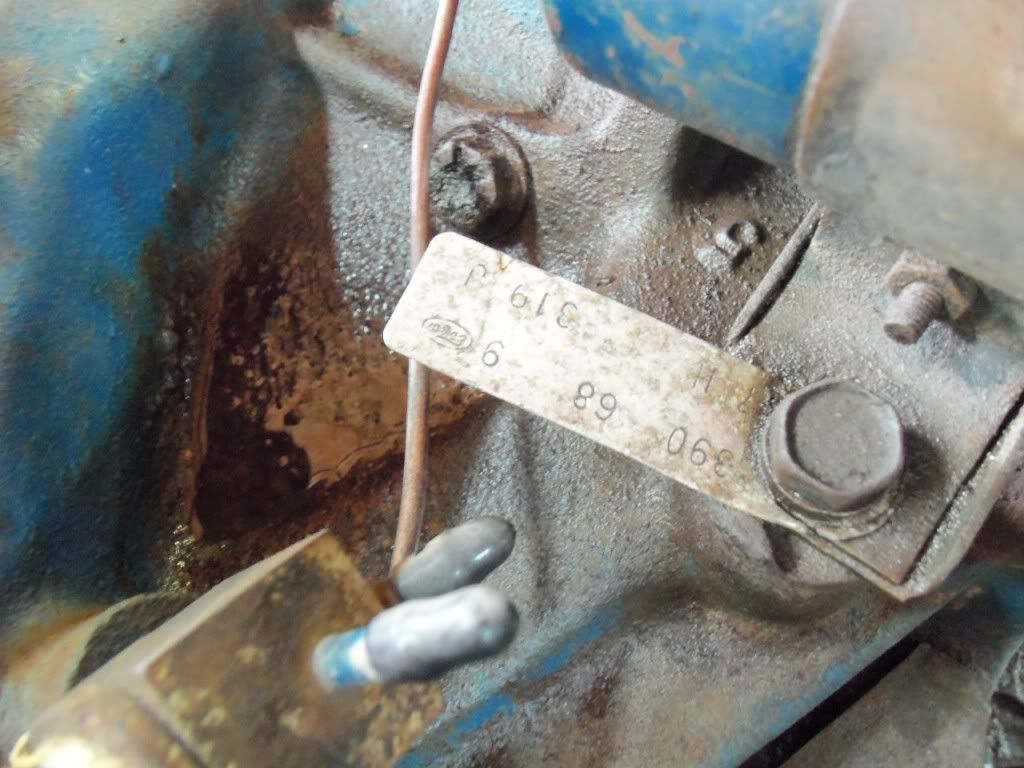
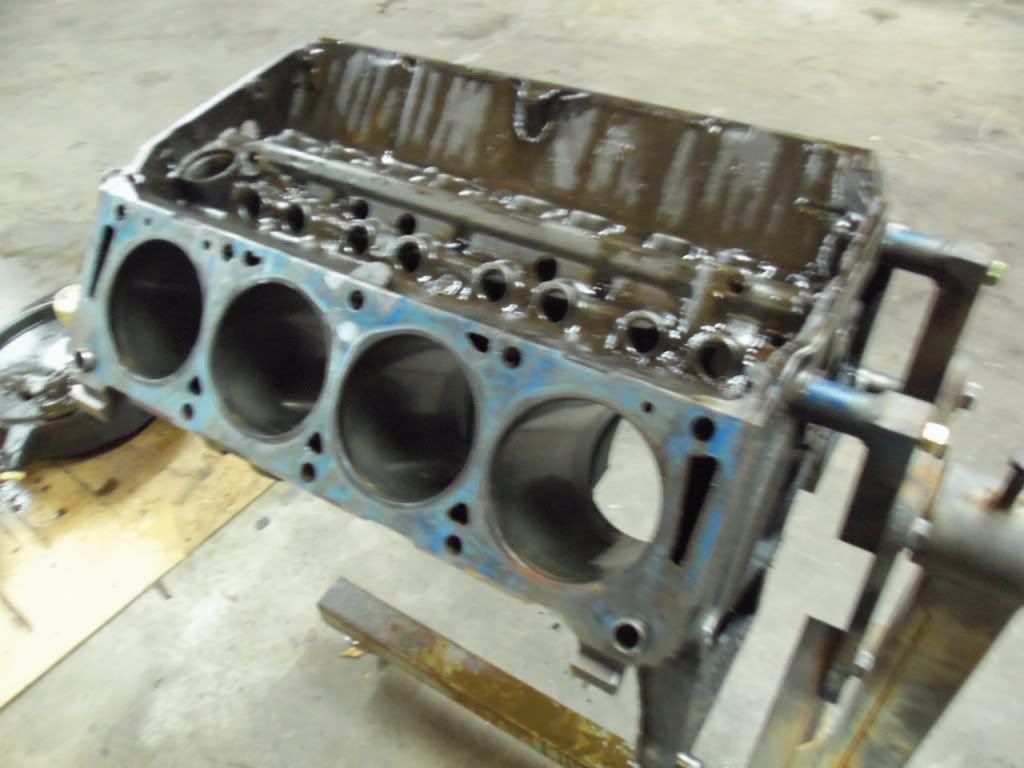
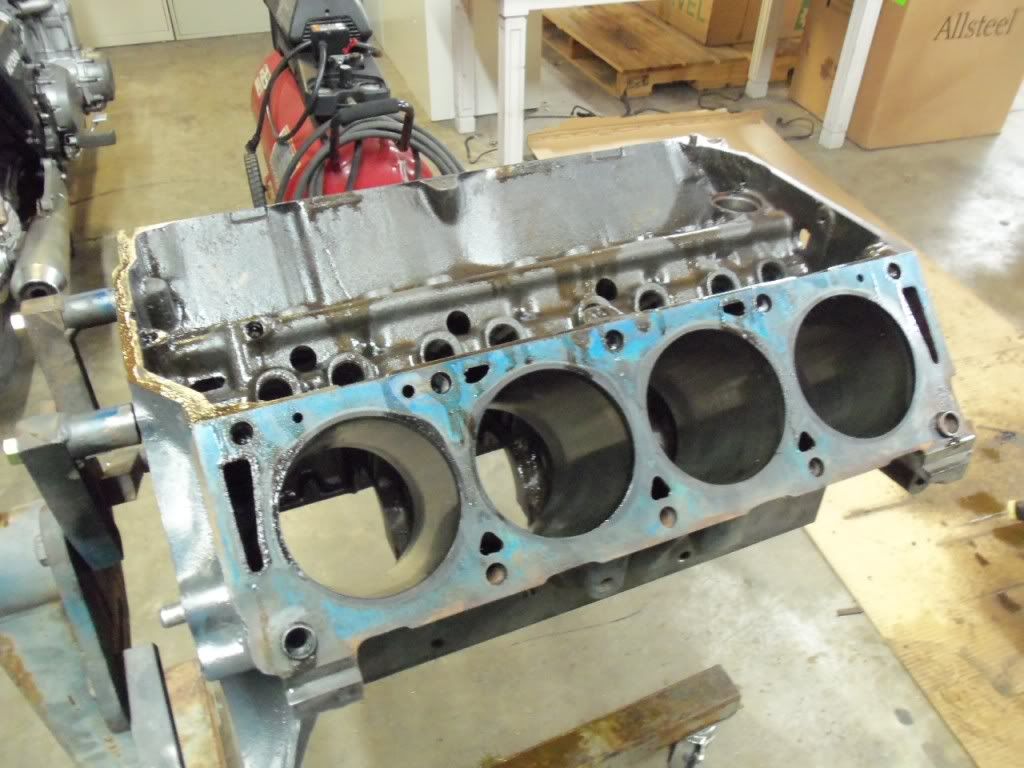
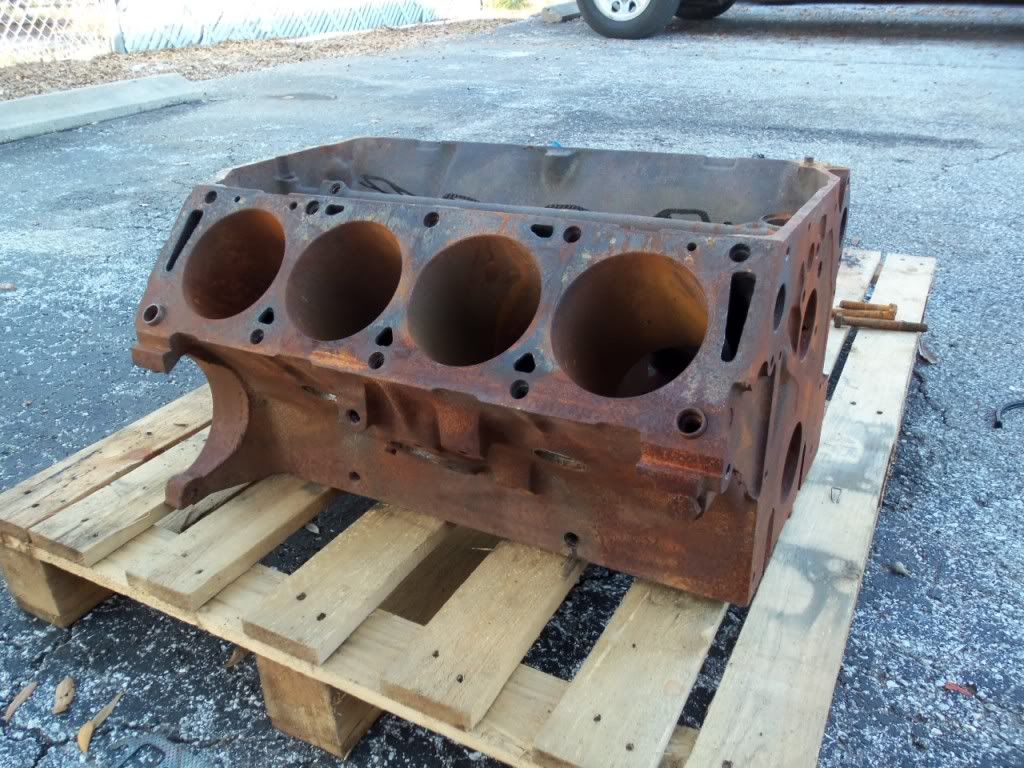
Before Mike started to re-assemble the engine I checked the engine over and noticed something inside the block that should have been clear and free. Inside the engine between 7 and 8 cylinders (up where the brake booster would sit and the hardest place to get to on these FE engines) there was something in there. After dinking around with it, I noticed that was a welsh plug/freeze plug…inside the block.


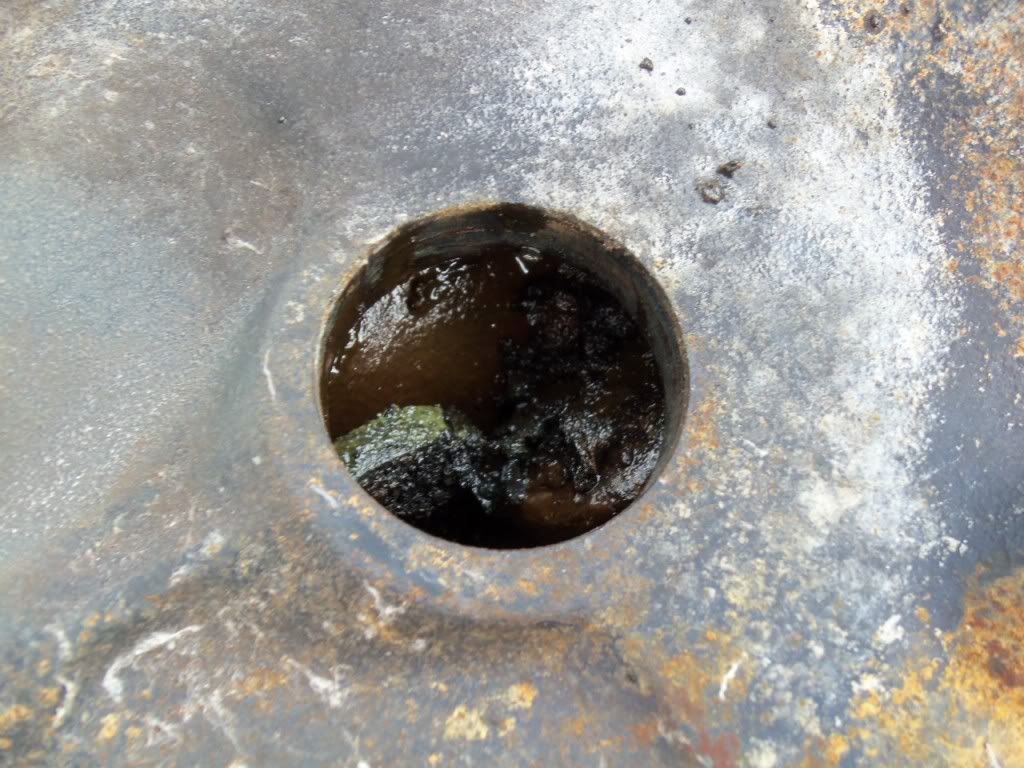
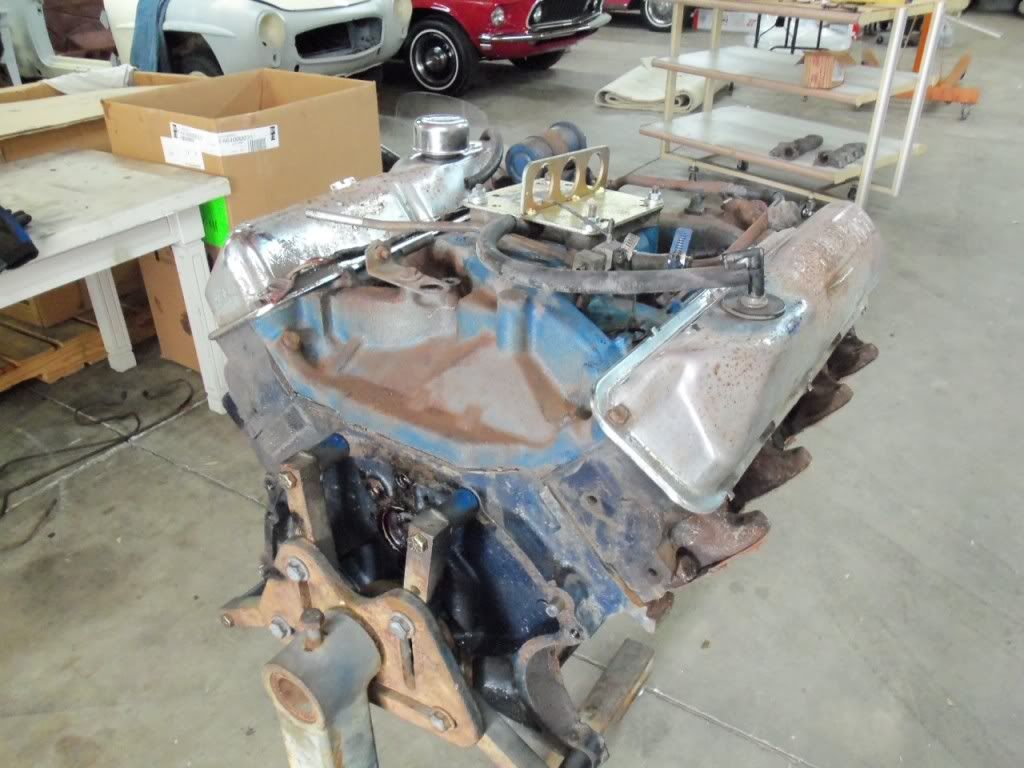
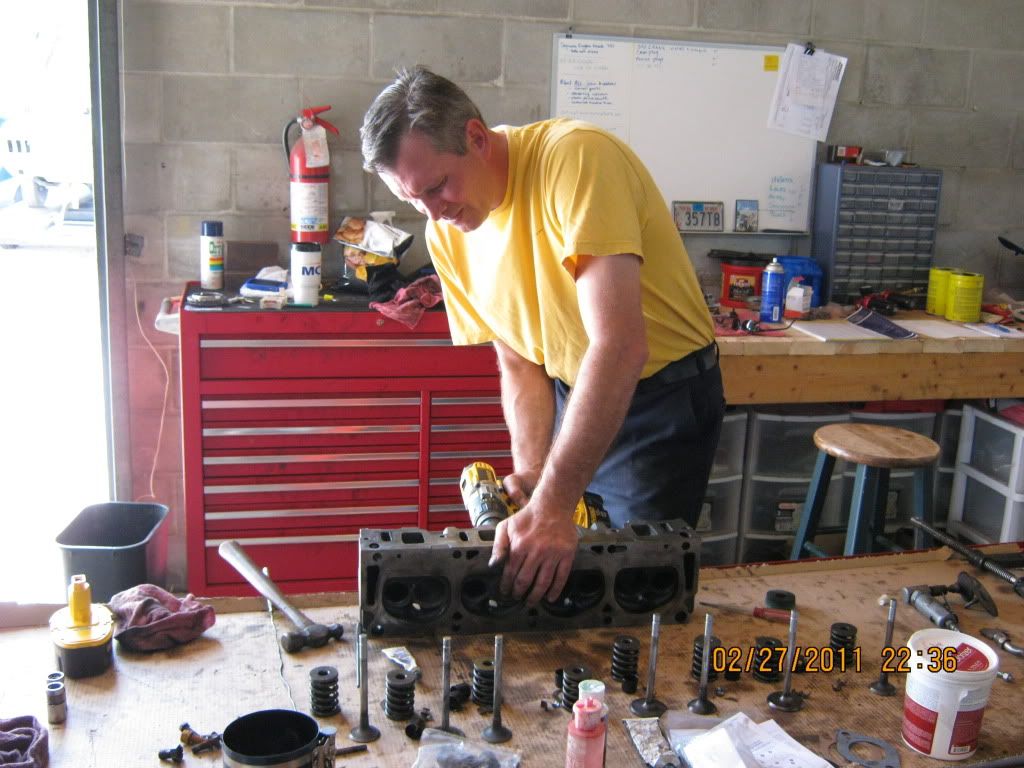
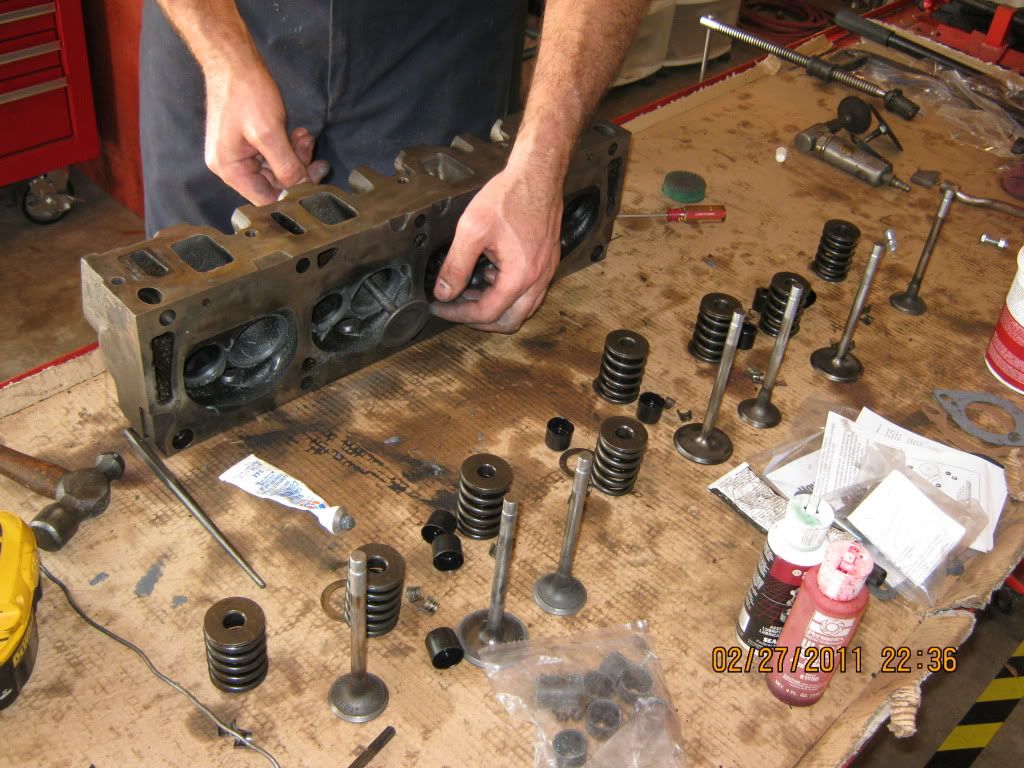
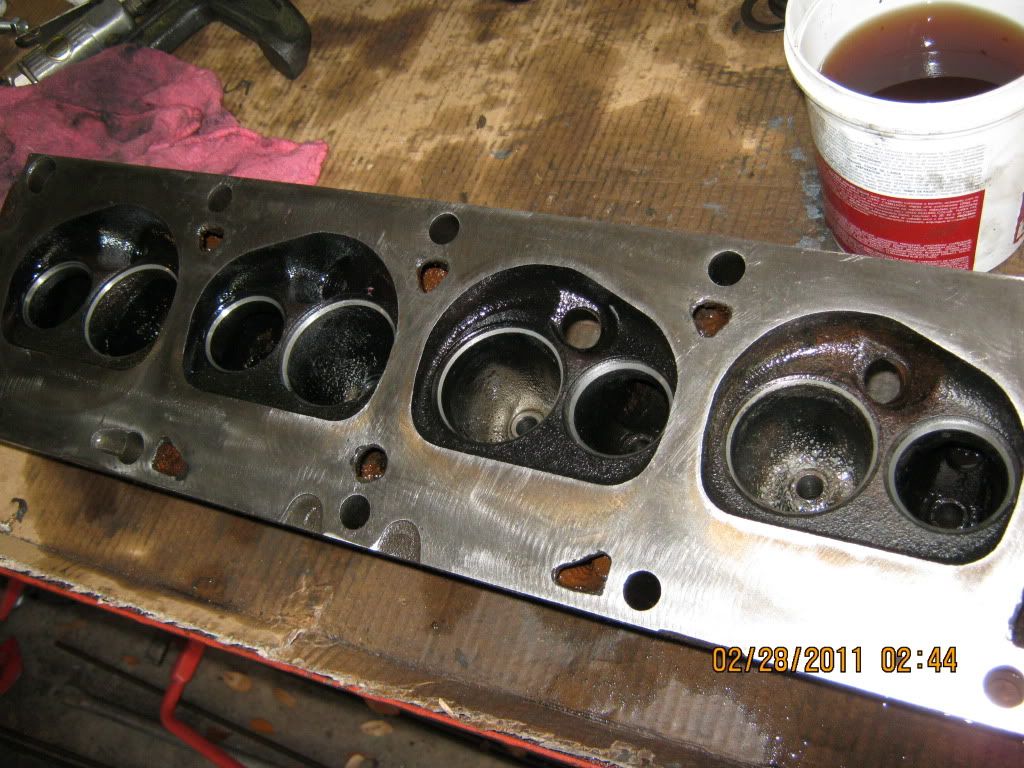
Mike grabbed some pliers and pulled it out. There was still something in there. He dug around and found another welsh plug….but wait, yep…there’s another one. 3 welsh plugs in the block. Someone had odviosly tried to put new plugs in the engine while it was still in the car and was having a prick of a time doing it with everything in the way. Would have been great for water flow. With those pulled out Mike cleaned it all out and started the rebuild


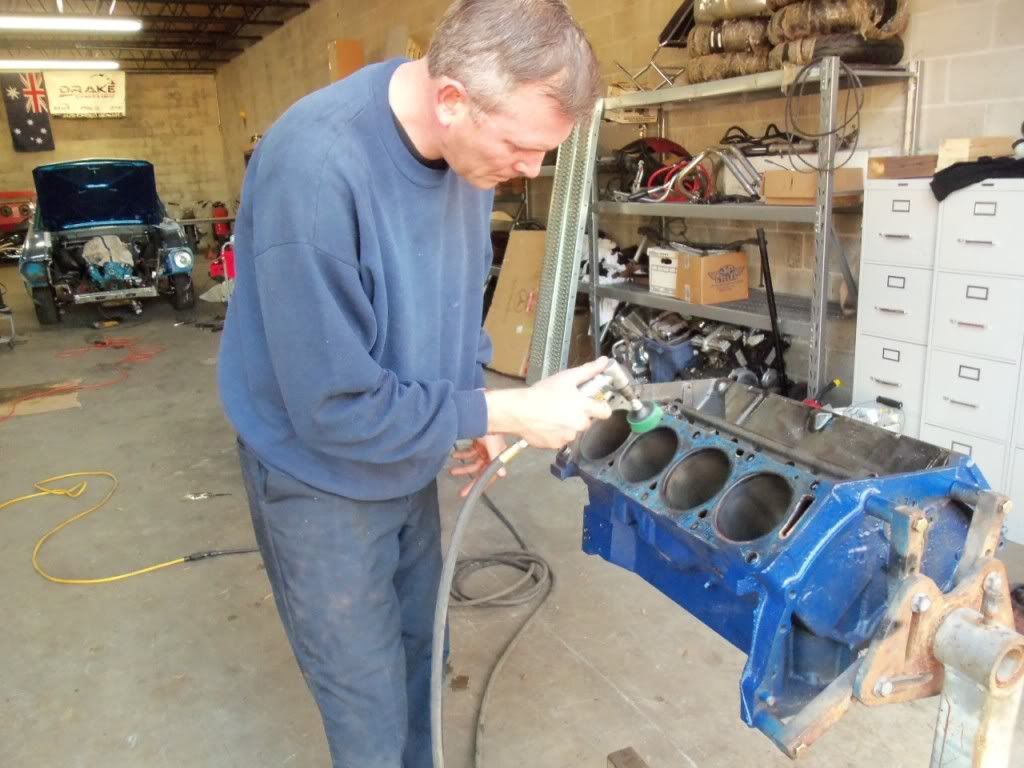
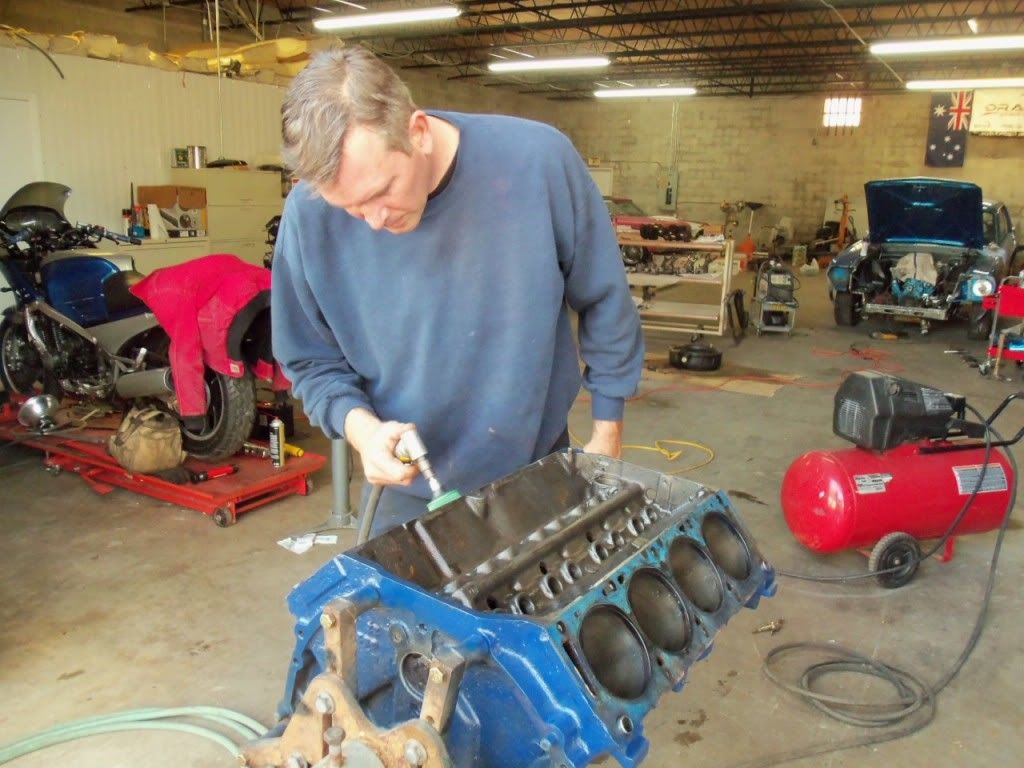
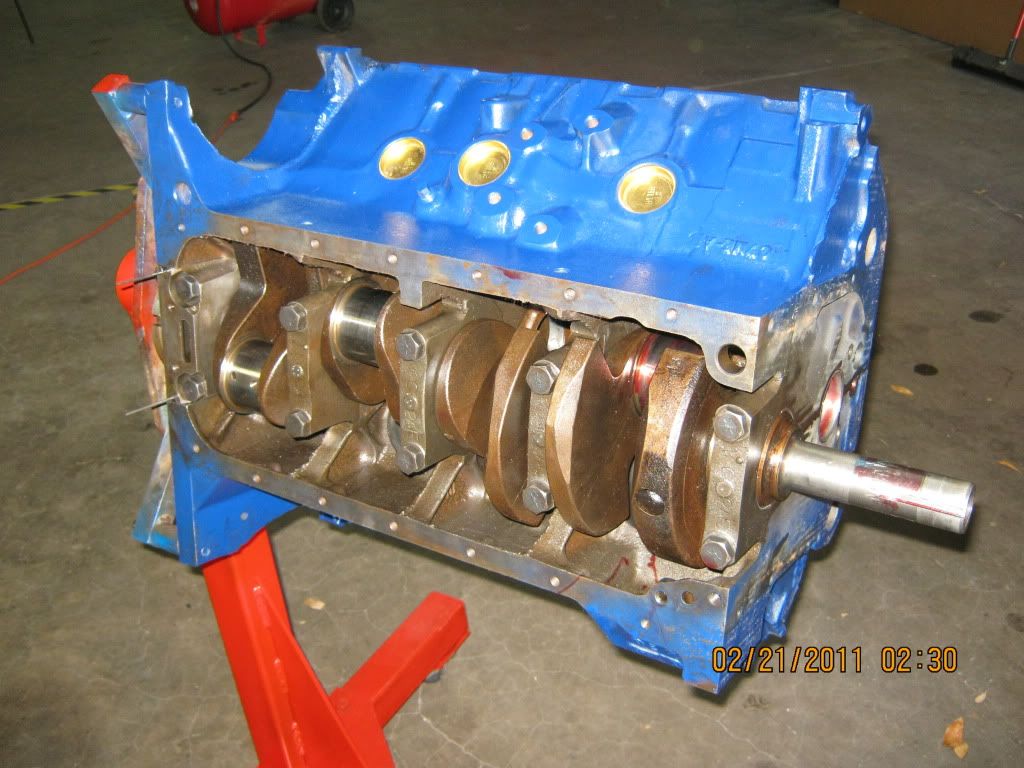
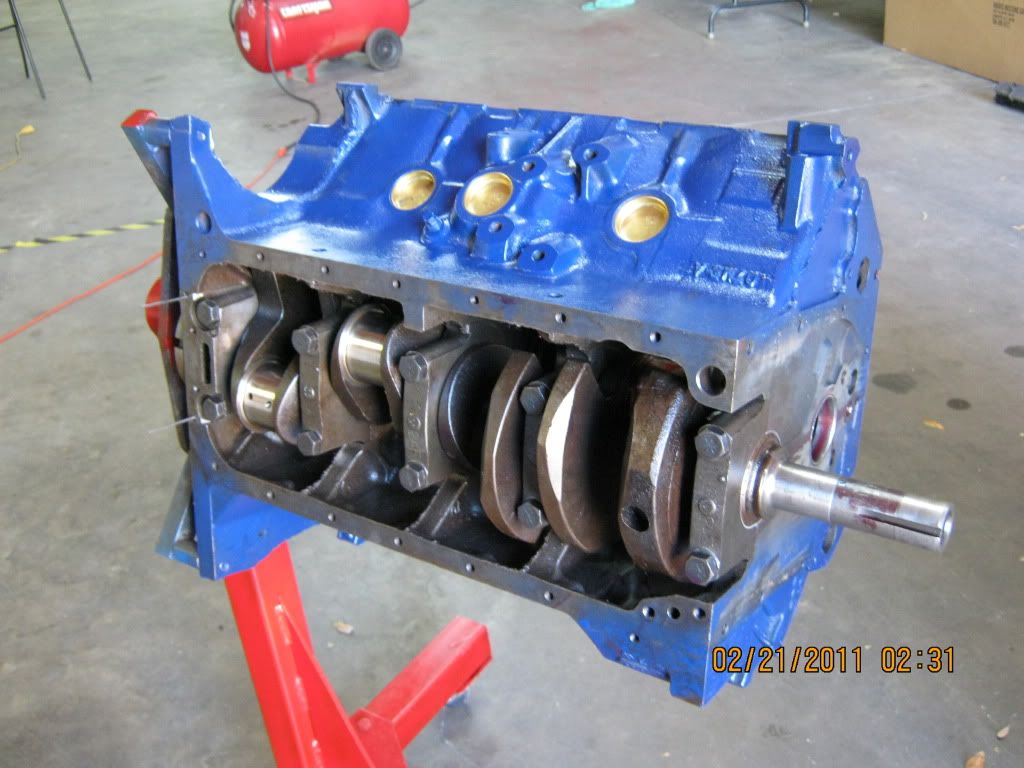
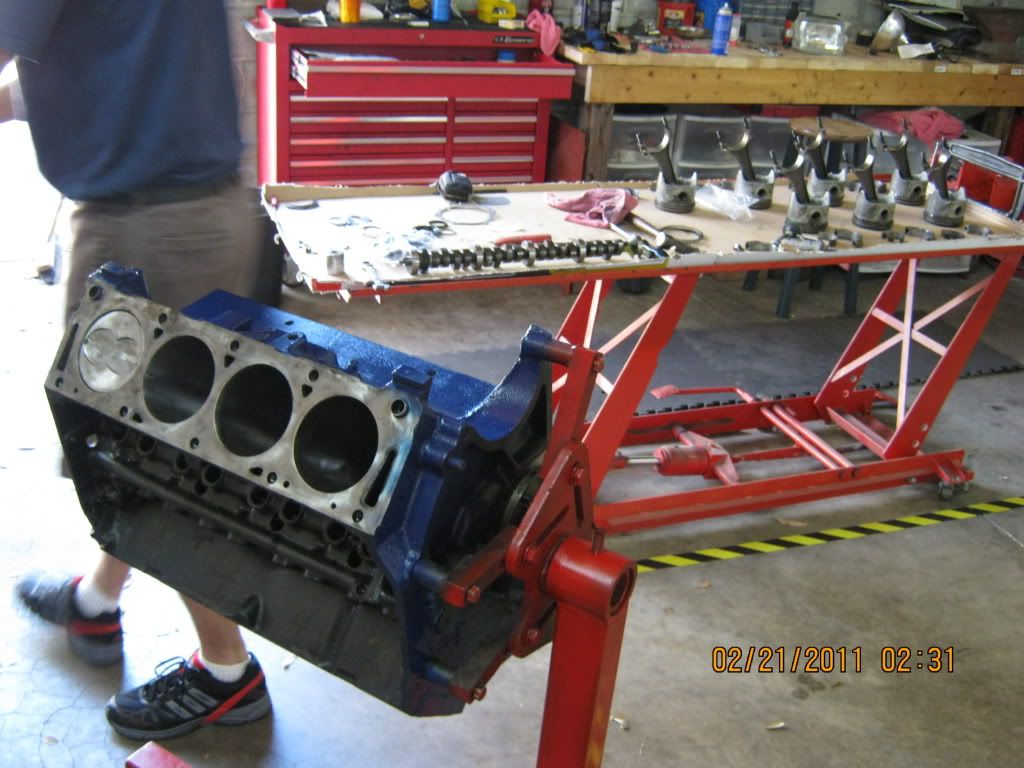
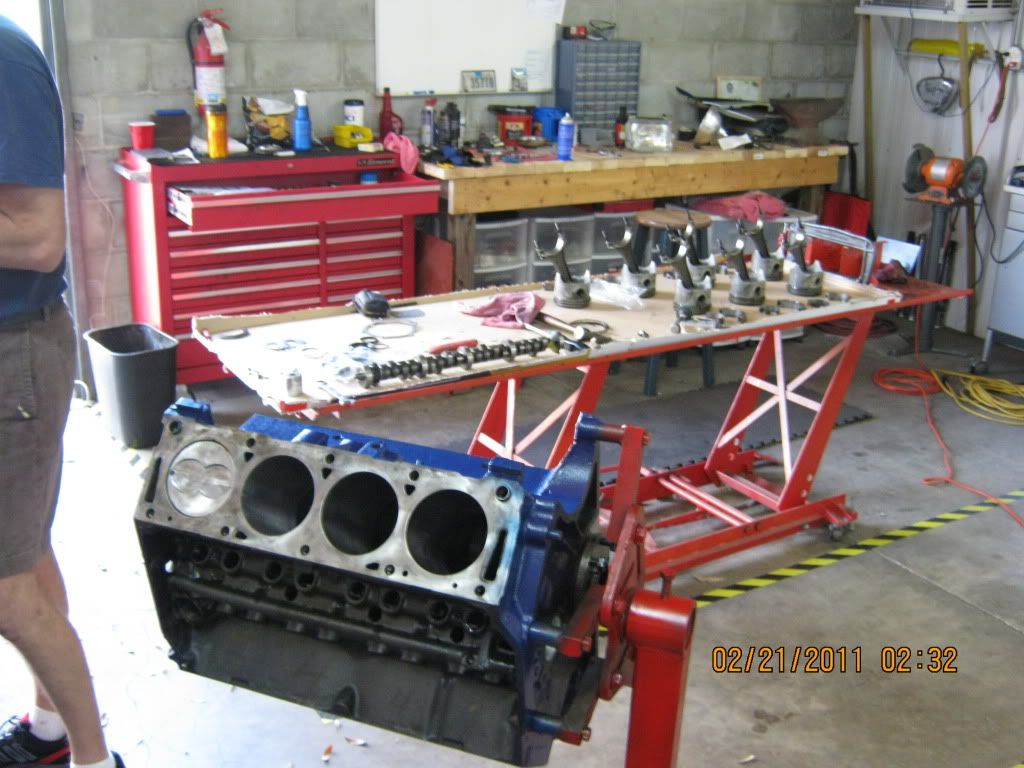
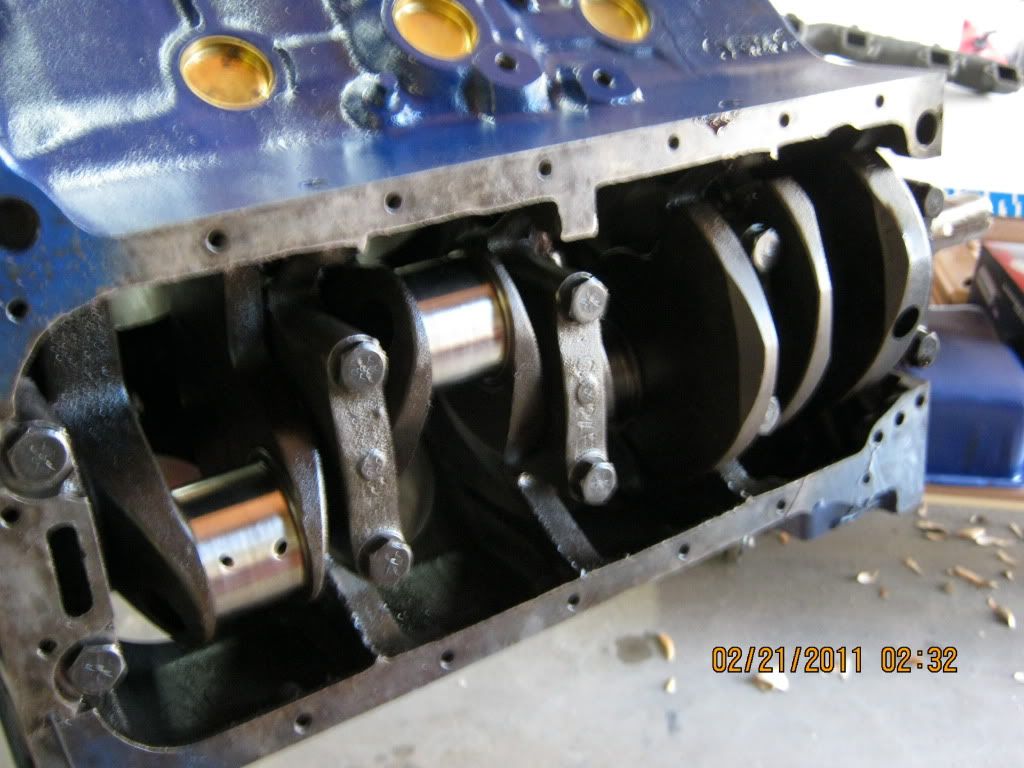
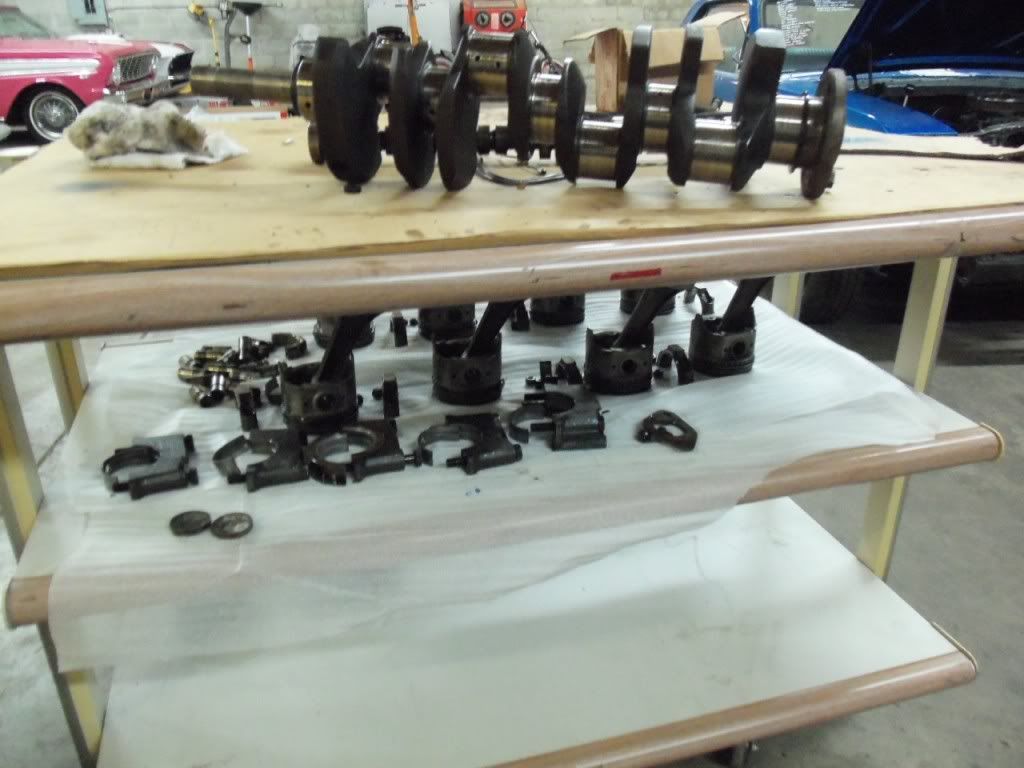
He had some delemas along the way with the crank aswell as the rods were numbered all mismatched and one was bent.  Few other problems with the build but all were overcome.

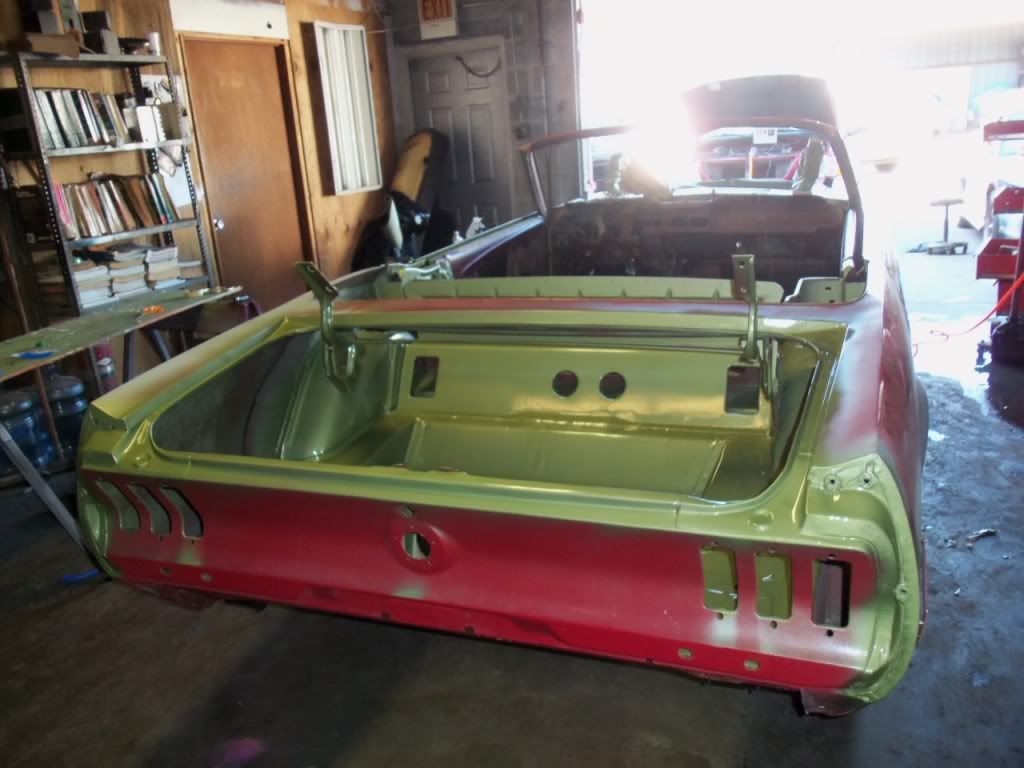
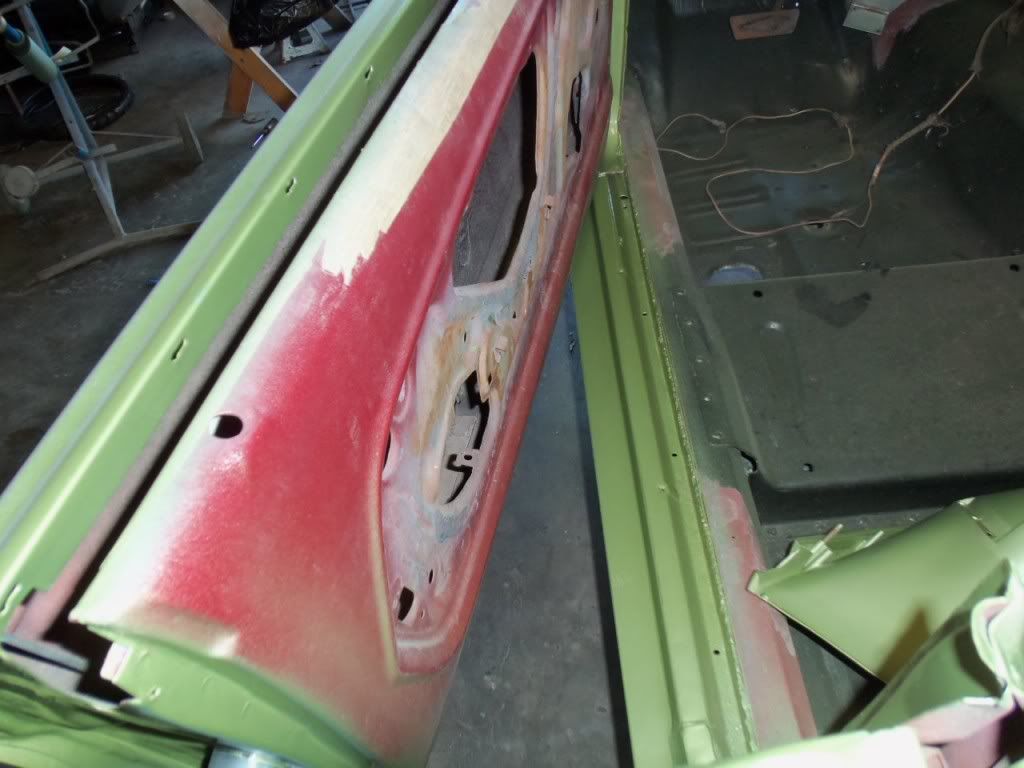
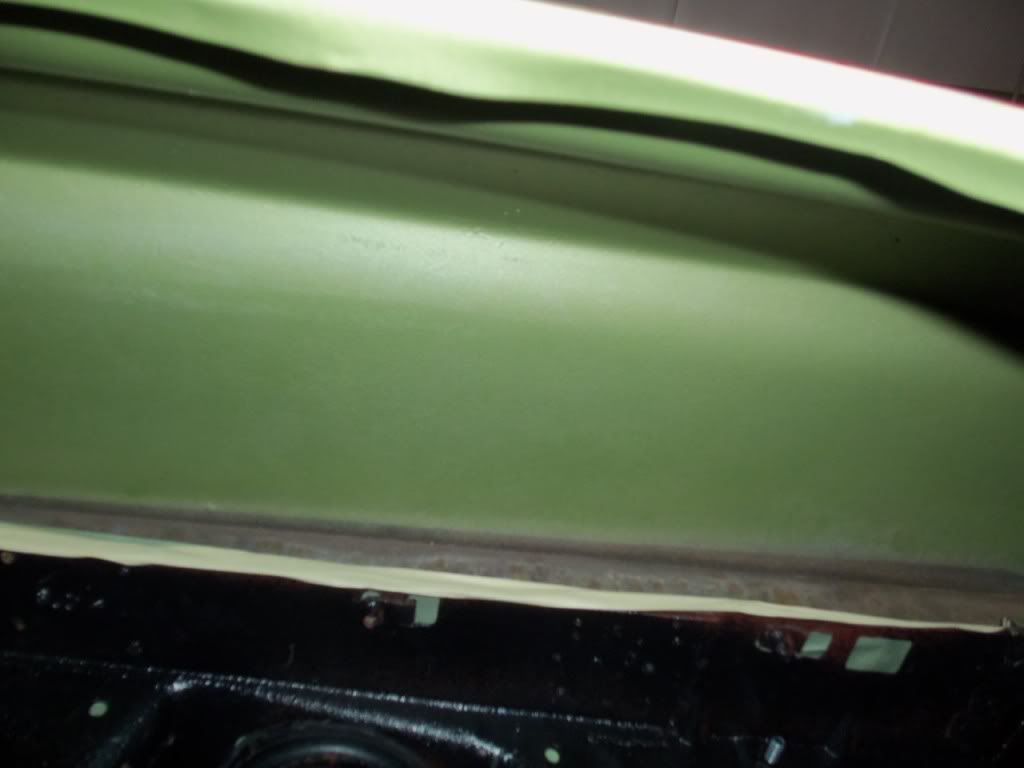
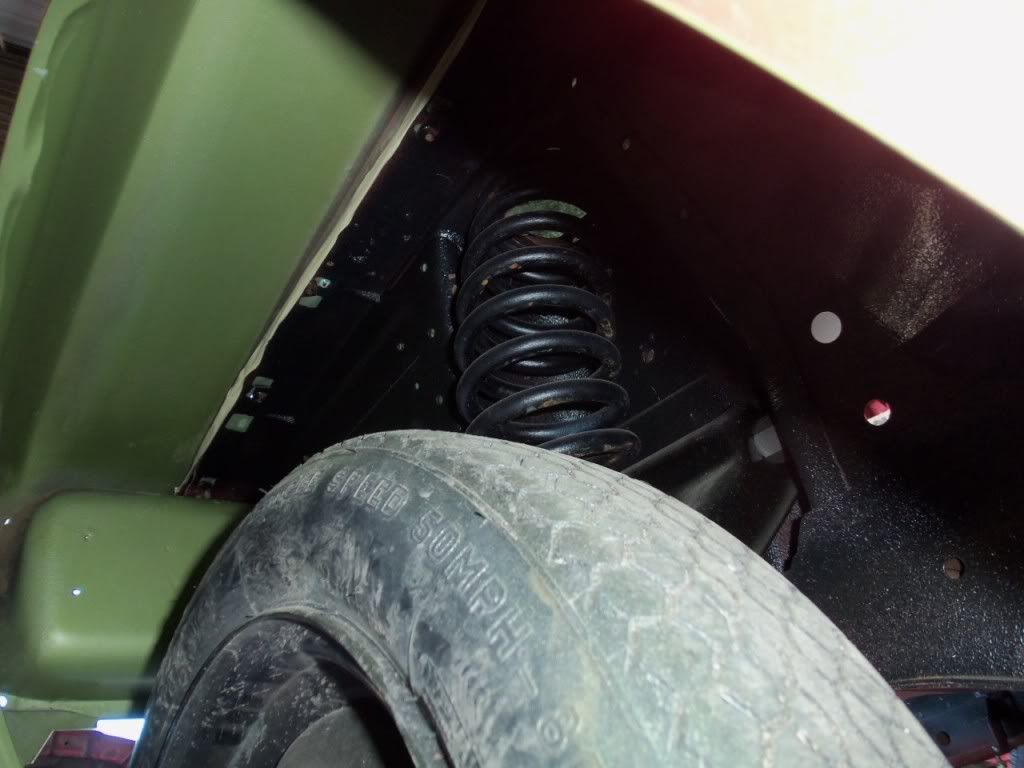
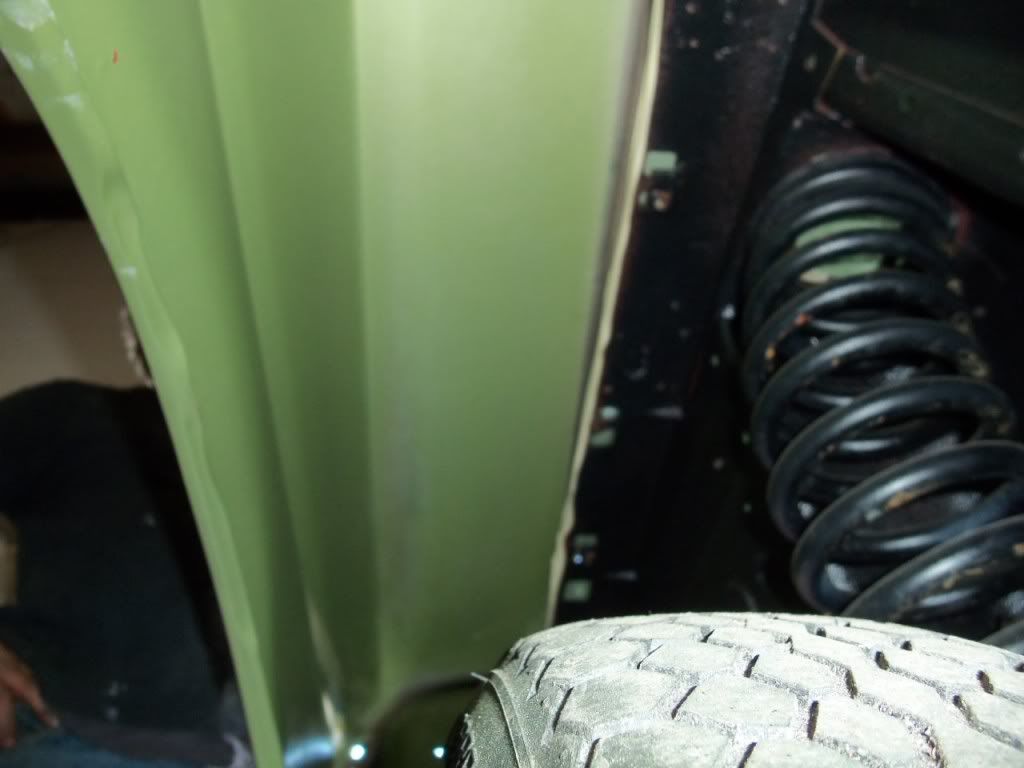
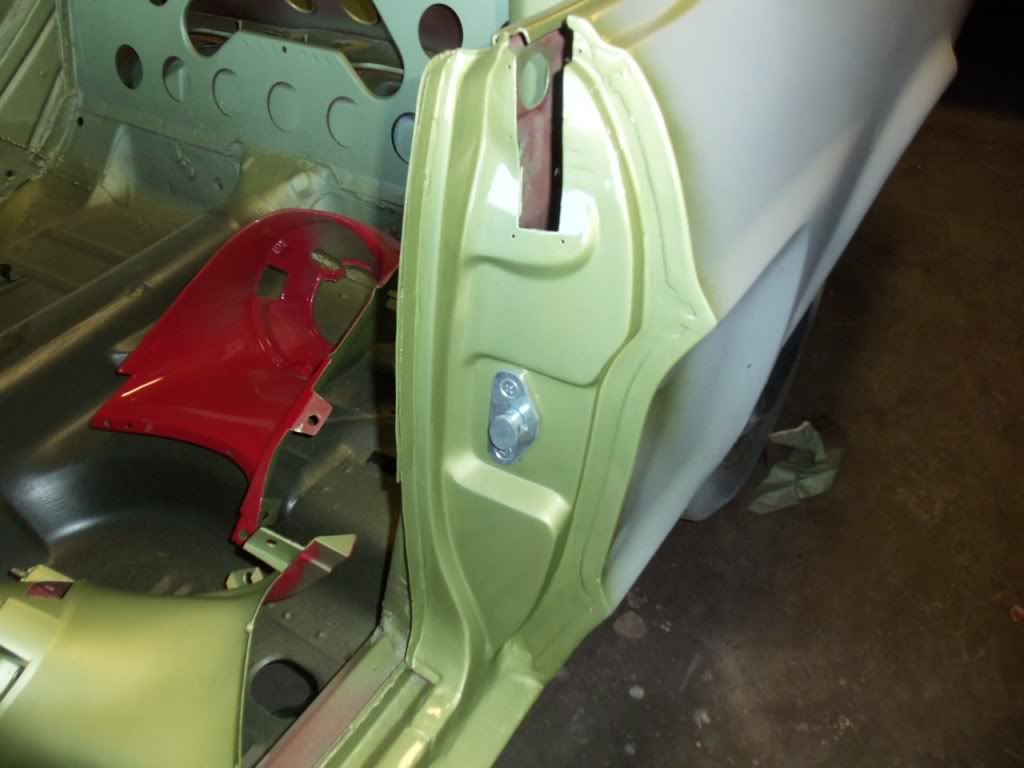
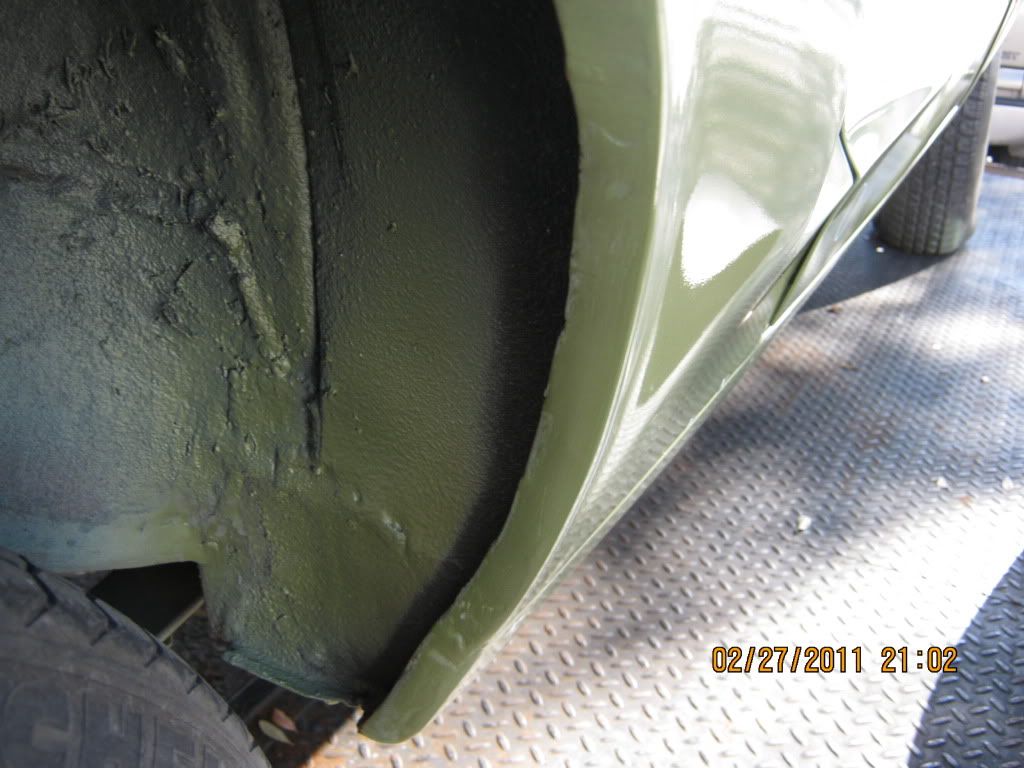
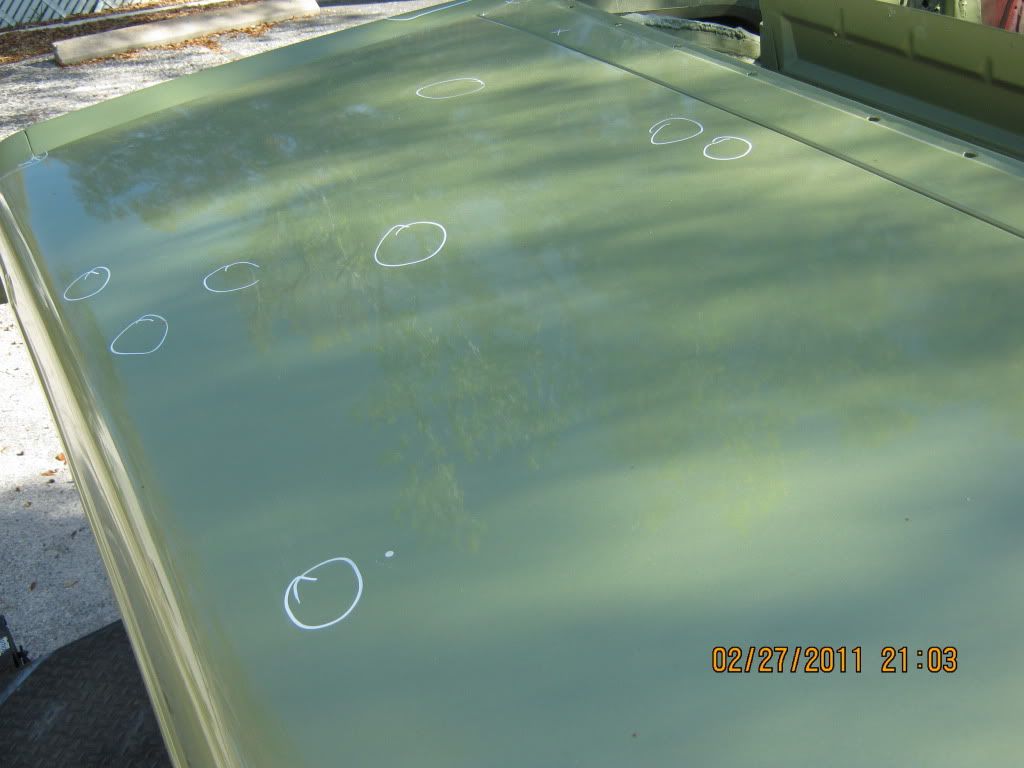
In the meantime, I had gone down to collect the car all finished (week 4). When I picked it up, I noticed a few things wrong with it and was very disappointed about all the over sparay all over what we had spent close to 3 weeks building. It was only when I got it back to the workshop in the shade that I found my worst nightmare. There was over spray over everything. Pin dents, swirls, no cover on the rocker panels or rear quarter lower parts….blah blah blah.

I was Pi55ed.

I went around the whole car with a water based POSKA and started to pick the pi55 out of the car. This is what I found. (pics where taken same day for John so you may not get the idea without a verbal description that I did as soon as it was morning in Oz) something that I didn’t really want to be the bearer of bad news.


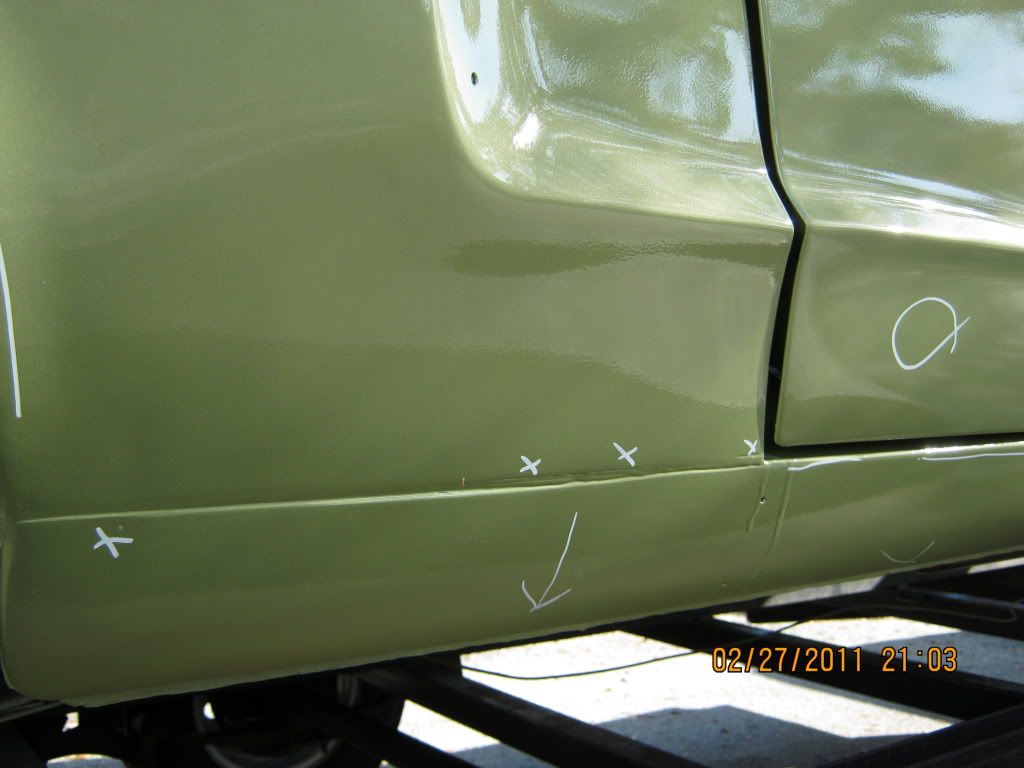
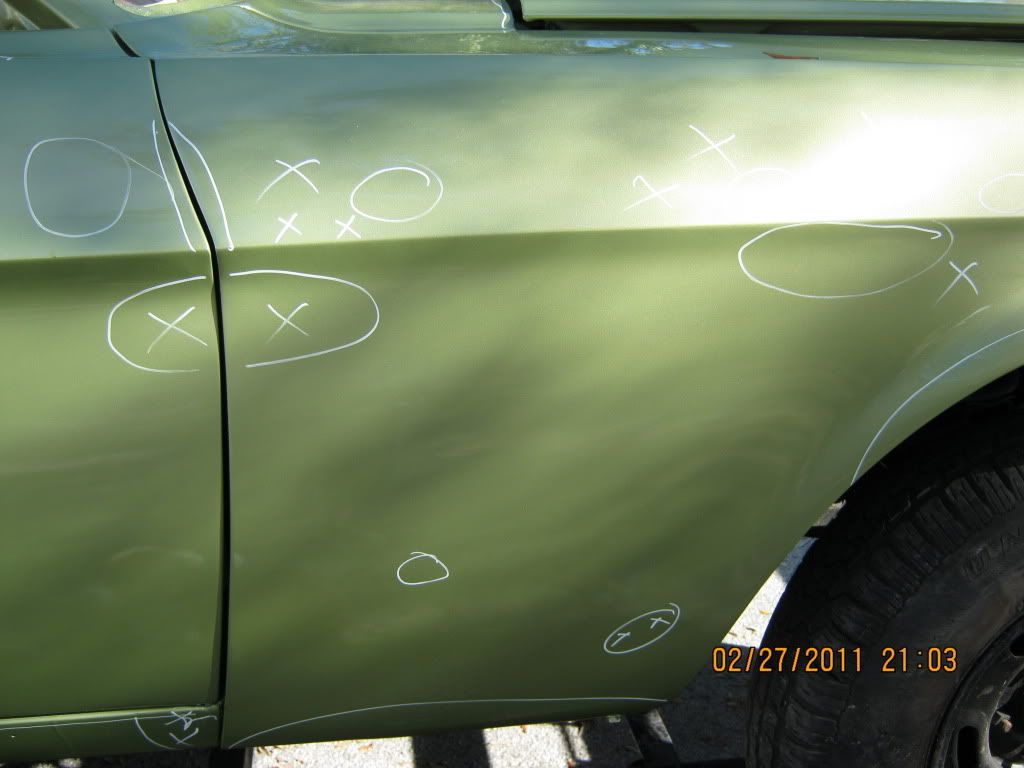
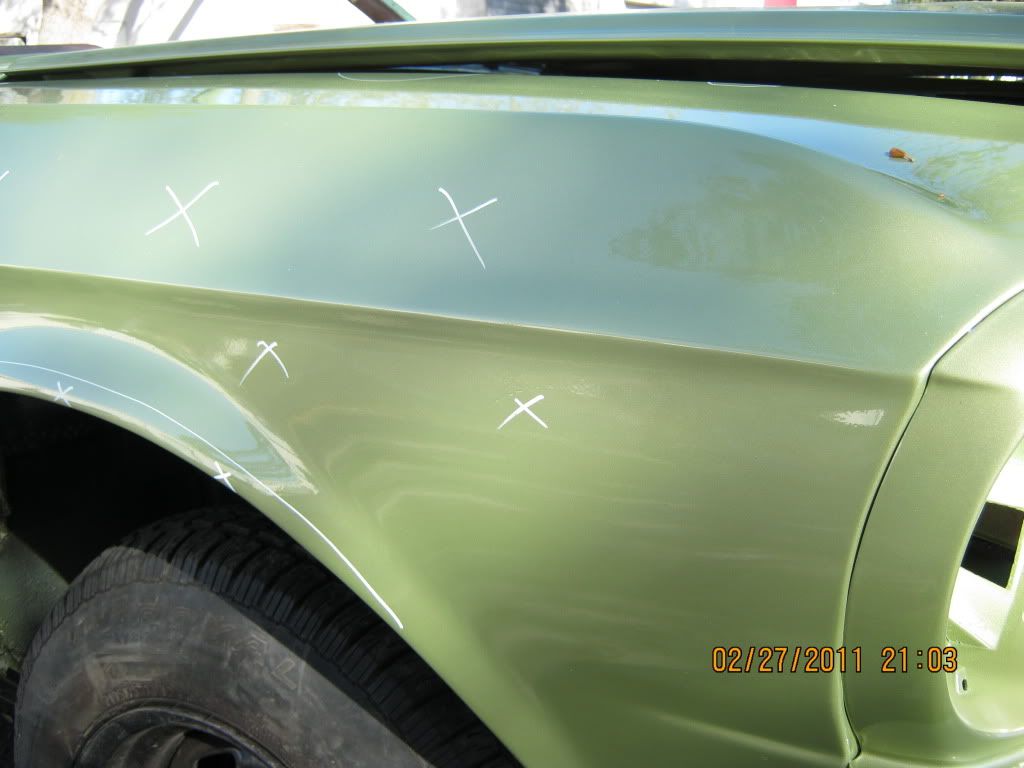
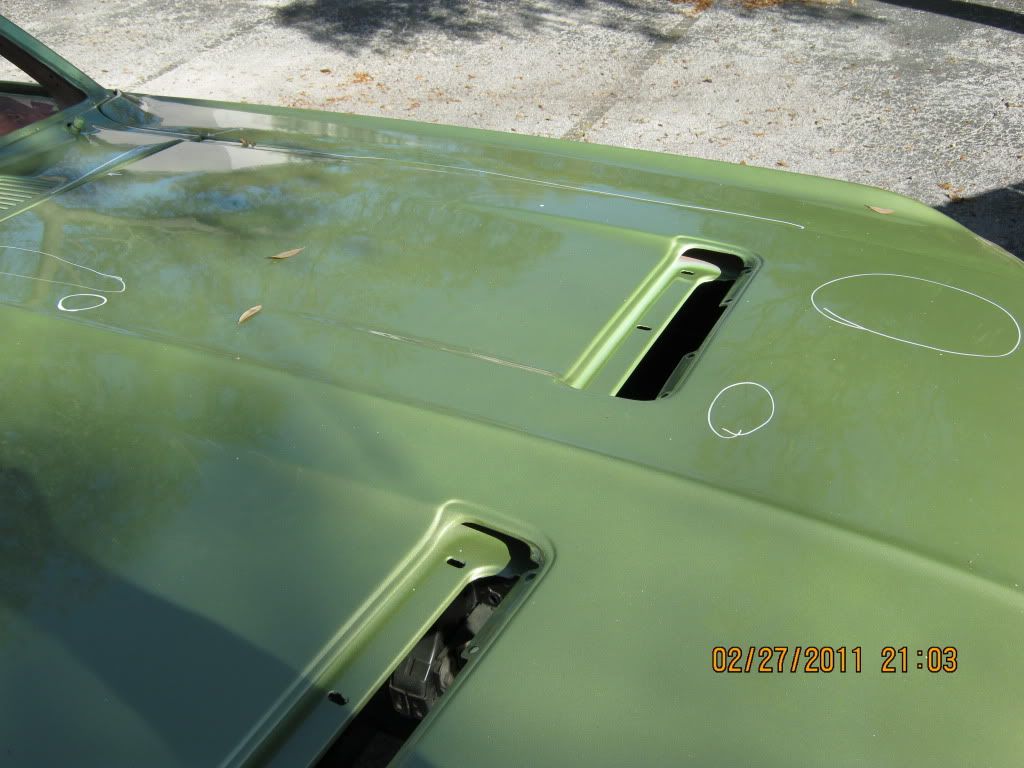
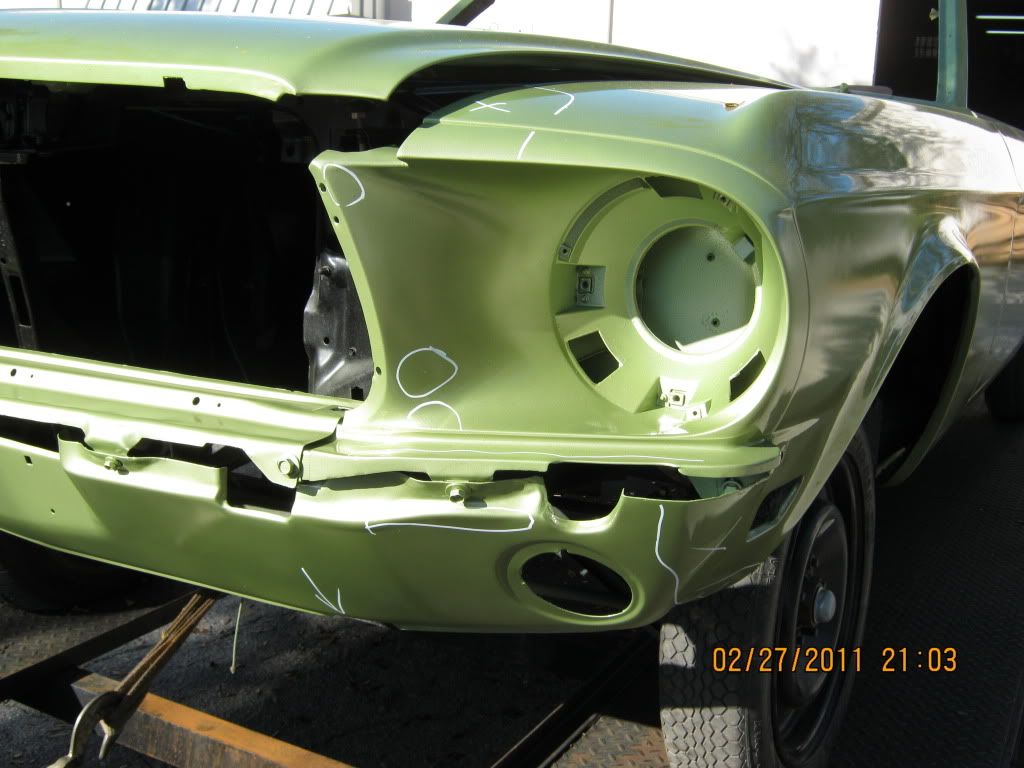
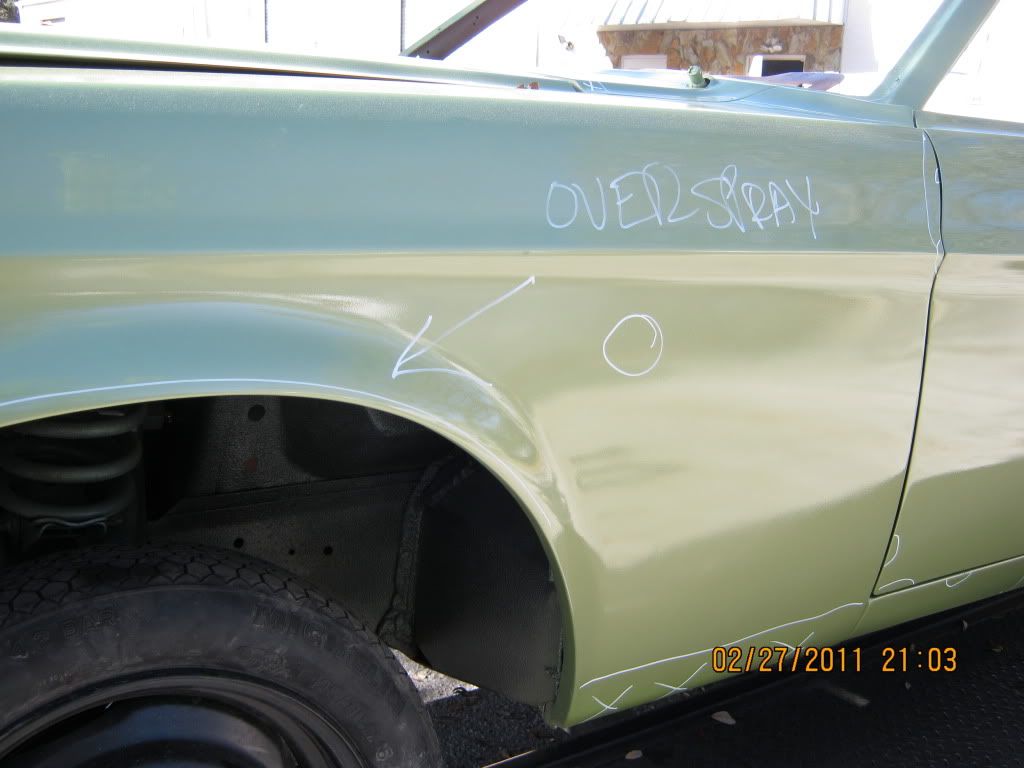
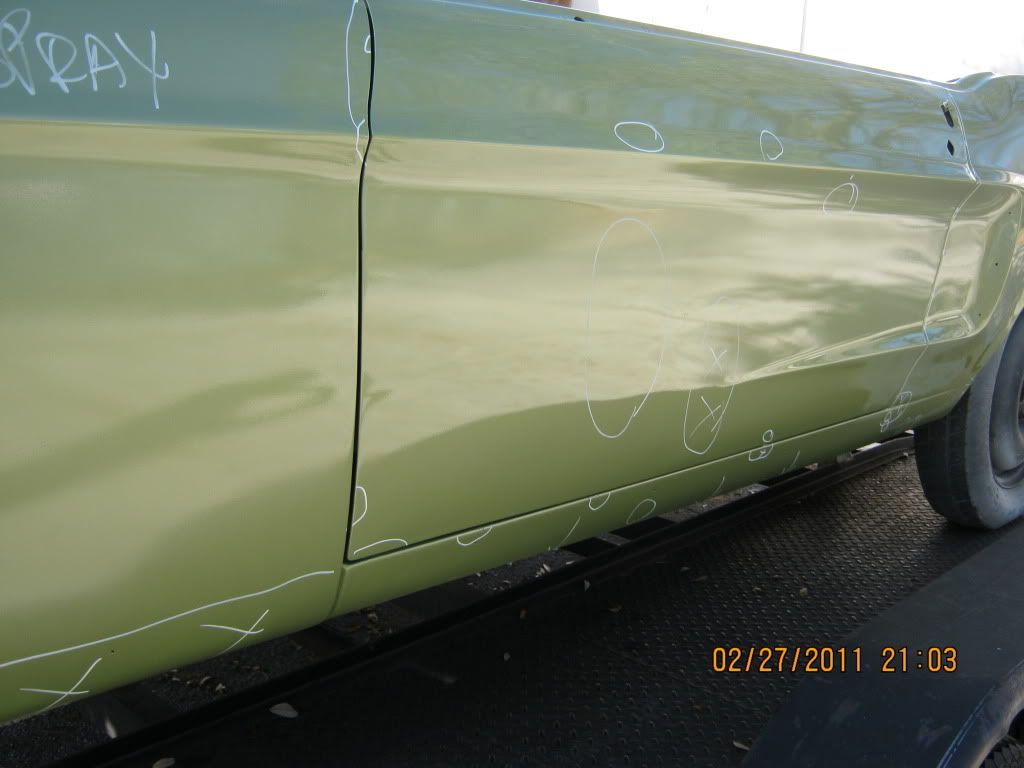
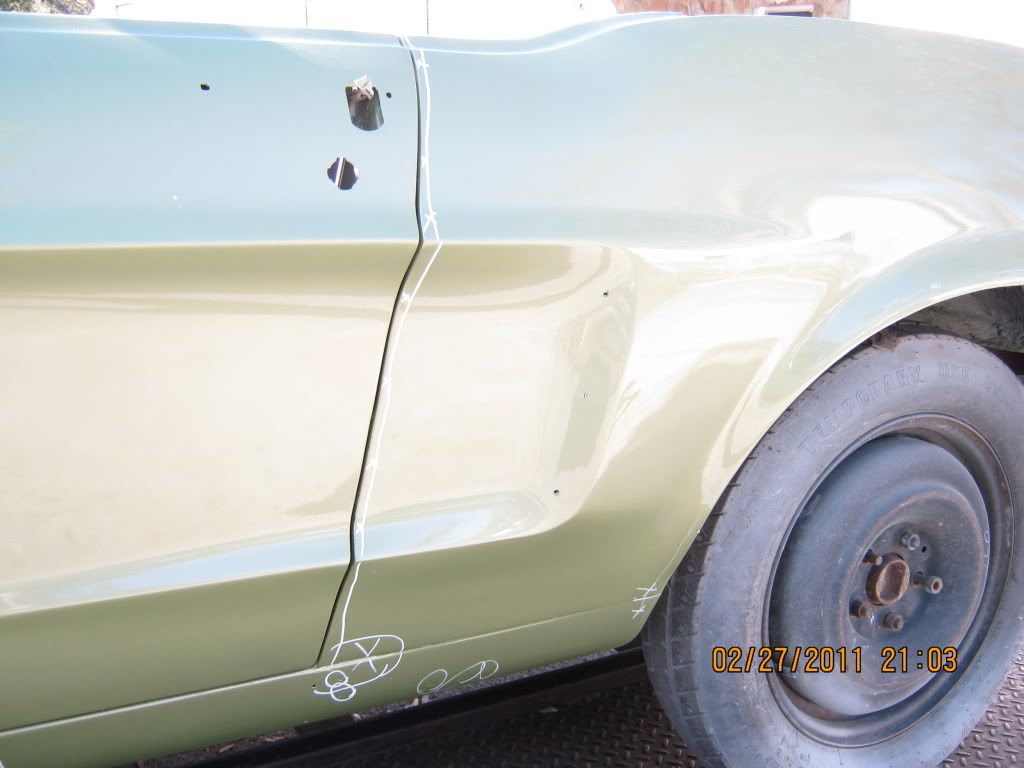
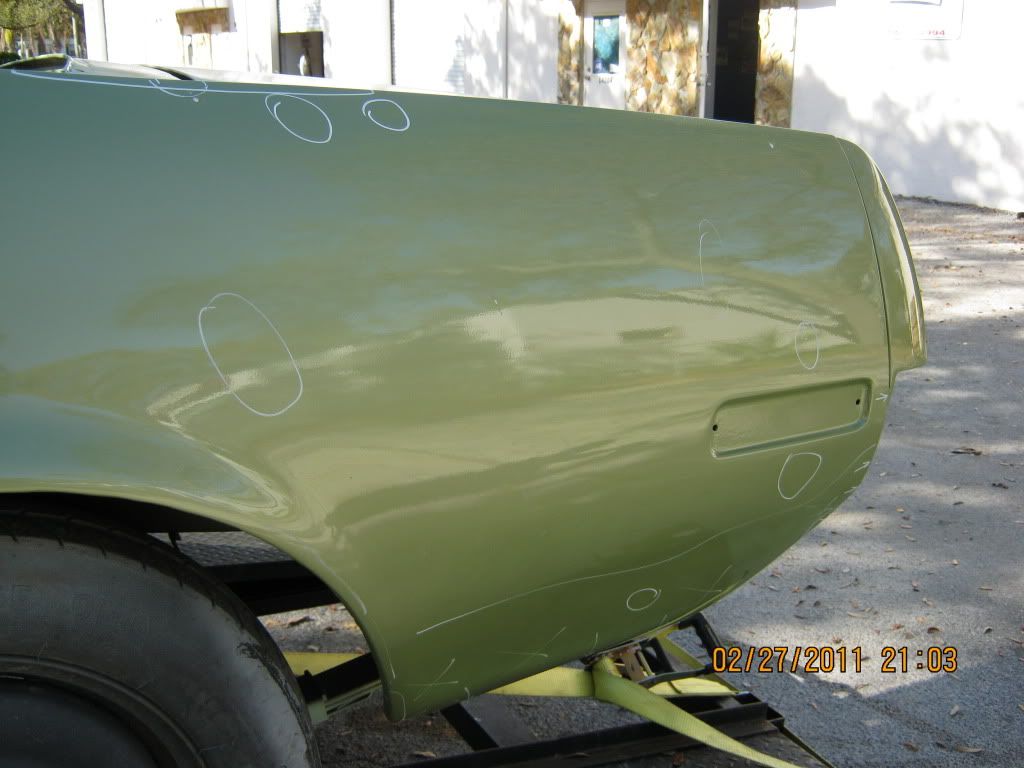
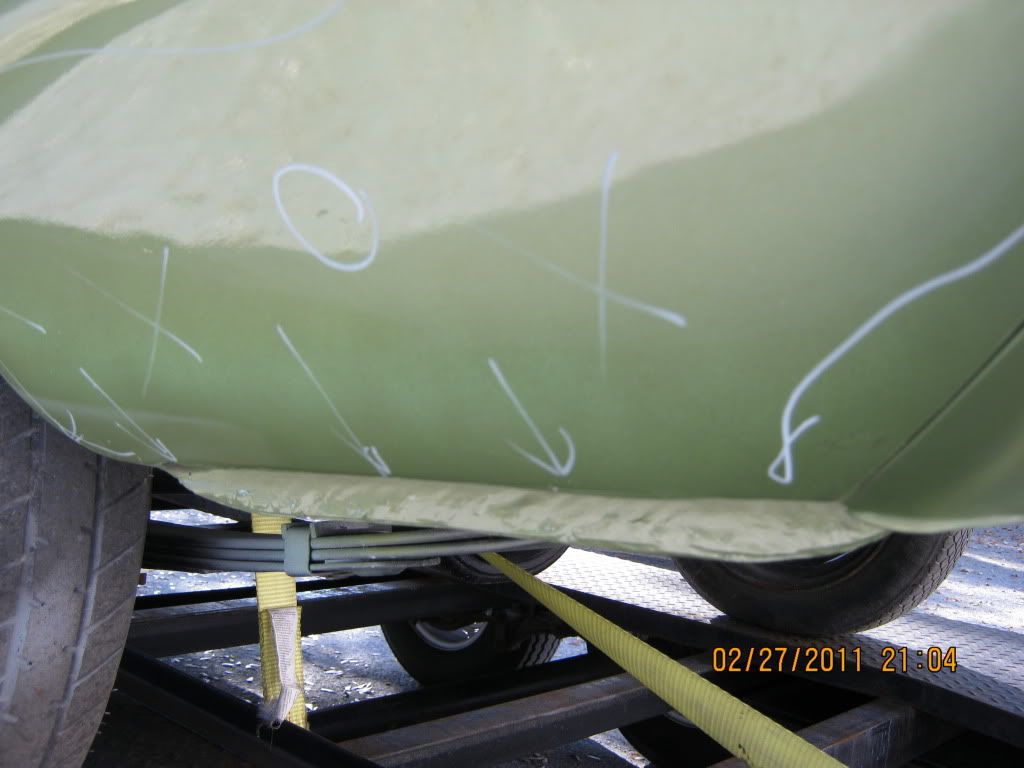
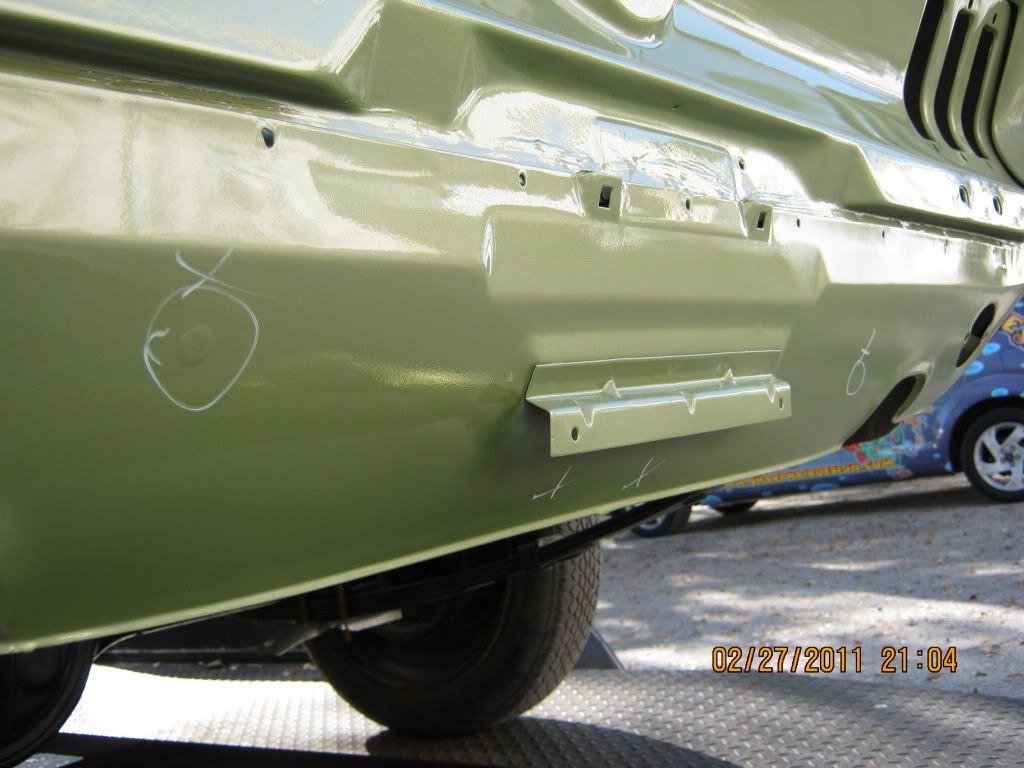
Yes, you can say I was very disappointed. I took a chill pill and went home and slept on the problem before I arked up. Next day I rang him and came to the conclusion, that regardless….paint is everything.
I told him what I expected and what I was prepared to do. Even though its not my problem I offered to pay for “ALL” new materials for him to rectify the problems and get it done right. Yes, I ate that aswell. $3000 is now gone (and some)
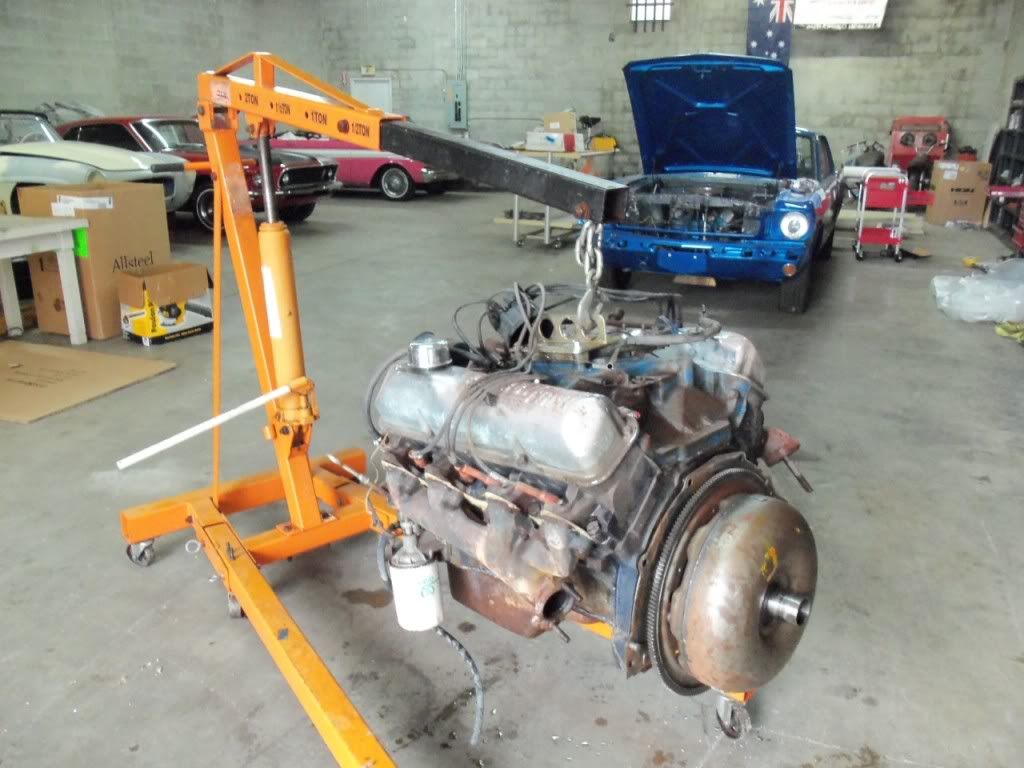
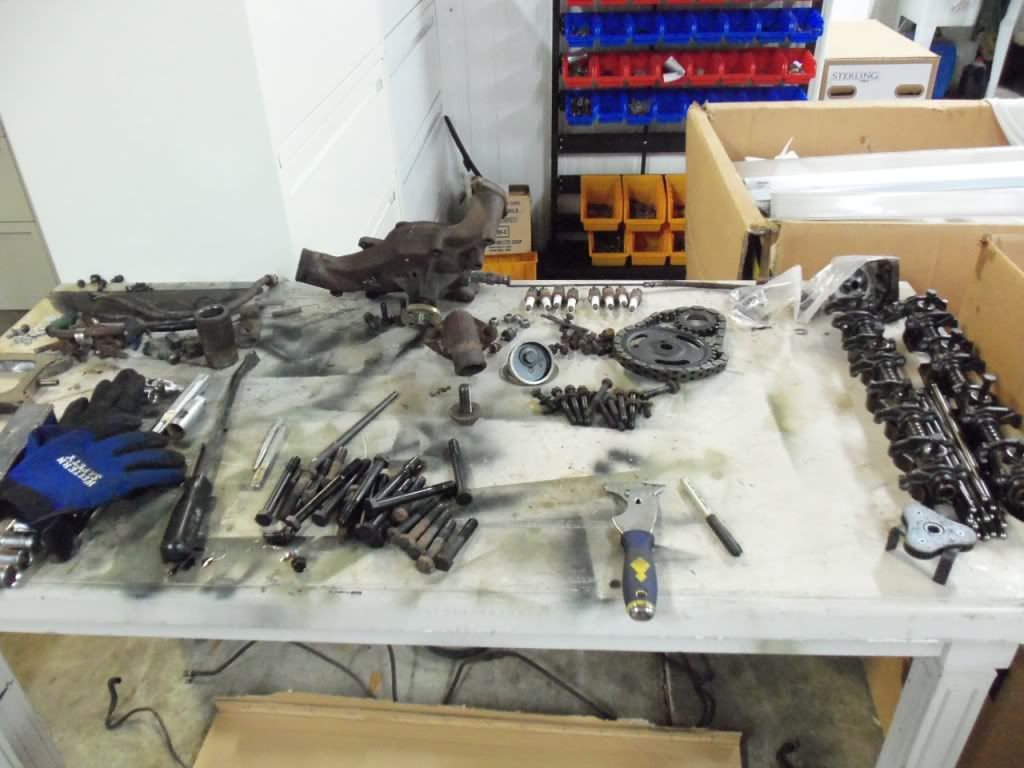
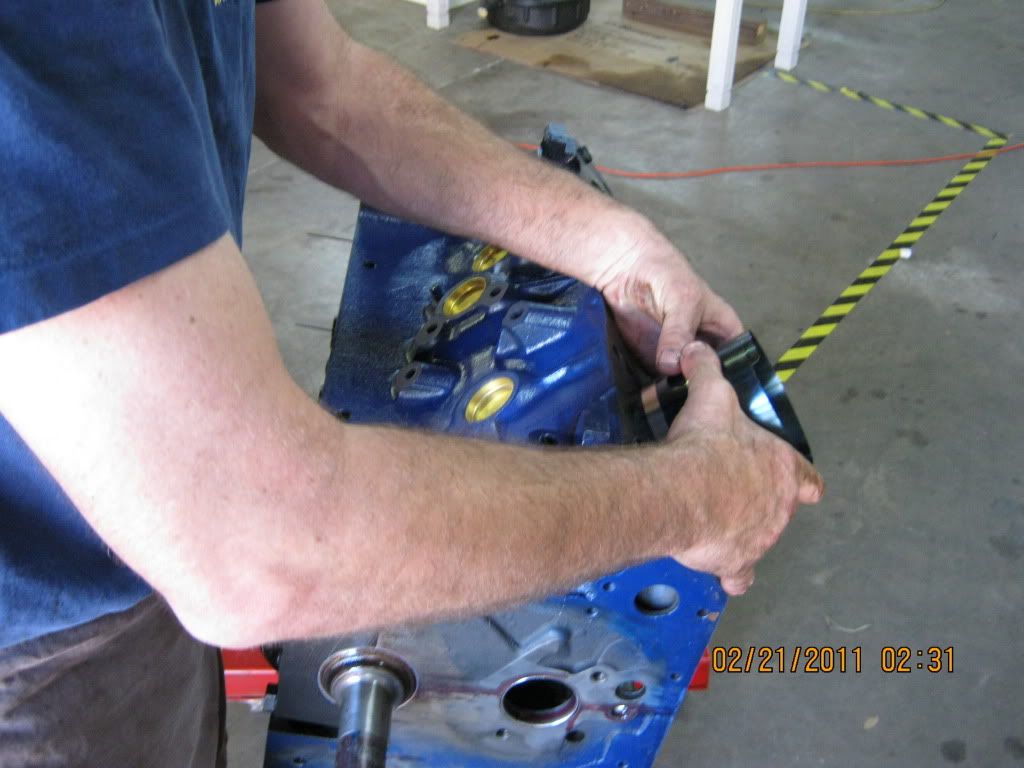
Mike finally got the engine to a stage of 90% whilst I was sorting all this BS out.


[IMG


Im sorry this is such a long post but I haven’t had a chance to post and upload all this coz Im just too busy but this is where we are at up until a month ago and I still have a little more story to go and most of the photos are on my camera. I have also done my back in so all I can do is stay home and stuff around on the computer so I figured I would get the 15 pages of photobucket and this story closer to where it actually is.

Actually, I might just dump em to photobucket now and finish it off now.
« Last Edit: August 05, 2012, 01:05:04 pm by peterp »

Offline Shermatt

  • Top Streeter
  • ******
  • Posts: 3529
Great Job
« Reply #6 on: March 30, 2011, 03:43:18 am »
Part 4  Shermatt strikes back

With the Deathstar almost nearing completion, Evil lord madden was counting the days before he could unleash the fury onto Australian roads and fire off his deadly load causing greif and peril to all those that encountered the evil sith lord. (AKA chopper)

Car came back from paint after 7-8 weeks and we ready to strip the old girl down again. Still very pi55ed off about the whole situation but we had a few weeks to chill out about it. The 2nd time round came out a lot better but Im still not happy with it. Im having him sort the rest out in our workshop so I can over see it before he touches it again. The one car that I wanted looking awesome first time round is just biting me on the #### not to mention Im now having to pay Mike to work on the car for the next few weeks to get it finished. Sometime it hurts but its all worth it. Lord madden owes the fatkid a beers or 1000

Mike got cracking on stripping the entire under chassis down and all the suspension for a repaint. Needed that like a whole in the head as it took a total of 4 days. Only finished it yesterday (Mon  the 28th 2011). Part of the respray was to also address 3 parts of the car that needed attention before it was assembled and none of it got done. Go figure. Thought while I was at it I would respray the engine bay again along with the entire under chassis, wheel wells and front inner fendor aprons.


While we were inside stripping down the mustang, Shelby thought he would get cracking on stripping down a tree branch to get into the groove of things and maybe help out in his own way. That got Sheri motivated to start cleaning up some of the new interior and stripping down the seats ready for upholstery.


Mike started to spend the next days blasting everything ready for primer while Shelby decided to guard all the parts laid out. Shelby protected parts going in this unit. Sheri got stuck into sorting the doors and Mike took a breather to dink around while she was on her back  LOL 


This is whats left of the 94 Lexus LS400 that we picked up for $600 for the Mercanstein project. Makes a great hanging rack for painting parts. Rest off the car is all cut up and donated to a friend that recycles steel. Im keeping the floorpan for the pick up points of where the old running gear was just incase I need some donar steel. Definitely want the transmission tunnel so were going to lay it up on the outside of the workshop until I have some spare time


In between Mike rebuilding the heater box, he gave me a hand starting on the engine bay and suspension. Got it to a stage yesterday where the diff was all back in. Rebuilt the rear brakes and lines and had the Evil sith lords car on the ground where it will sit for 4 days so we can finish up another job being shipped on Friday. Having a dodgy back doesn’t help none either.


I did manage to get the entire interior sanded, primed and painted but ran out of charge in my camera so I am going to get some more snaps as soon as I fing the charging cable. But the best picture I can give John right now is these ones. Love finding the build sheets in a car for any of our clients. Im just as exited as they would be. Need to get some moisture next to it to soften the brittle paper but that’s something that takes a huge amount of time so I will get to that when I have 3-4 hours free.


« Last Edit: August 05, 2012, 01:07:41 pm by peterp »

Offline rocket

  • Please visit our new Website
  • Blue Printed
  • ****
  • Posts: 1621
  • MOCSA Member No. 894
    • Image Classic Cars
  • Location: South Australia
Great Job
« Reply #7 on: March 30, 2011, 08:38:10 am »
 
Good job Matt. Looks to be coming along nicely.

Was a bit confused at first seeing the Red colour on the car, but glad to see it is has been painted Lime Gold. Gorgeous colour!

Rocket.
Check out our new Website

http://www.imageclassiccars.com.au/

Offline Shermatt

  • Top Streeter
  • ******
  • Posts: 3529
Great Job
« Reply #8 on: March 30, 2011, 09:48:21 pm »
Rocket

can you please send me your paint guy for a few months :hammer::hammer:

apart from that its coming along nicely

Matt

Offline Shermatt

  • Top Streeter
  • ******
  • Posts: 3529
Great Job
« Reply #9 on: March 31, 2011, 05:50:56 am »
PART 5
By request of Sheri, I was forced to stay home today so I decided to try and unfold the build sheet without breaking it. Ive done this before but it is very nerve racking and you need to be extremely patient when separating all the pages as there glued together and brittle. Not all of them are, I pulled one out of a 1 owner 67 fastback last week and it unfolded easy as. This one seems extremely brittle.

I boiled up some water in the microwave, laid down a Tea towel to absorb the condensation from the pan I was going to cover over the boiling water with the build sheet under there aswell. Left it for 4 hours, came back and managed to get one fold open but that was a little pain in the a55. But alteast now the outer pages are not as brittle.


I know its no biggy to some about finding your build sheet and having a pictorial about how to salvage one without breaking it, but Im stuck home all day laid up on the couch and wanted to do it anyway. I hope it may benefit some.

I boiled some more water and started the process again. I forgot to metion, you have to leave a gap at the base of the pan or you will soke your document and turn it soggy. The rest of the pics are taken through out the day. Leaving the sheet under the pan on each UNFOLD if that’s what you call it


Now if you cant read that, that must be something wrong with you….LOL  :smile01:
I managed to save 99.9%. I partially lost a page number but nothing relevant to the specs on the car. Before I went to lay the sheet flat, I quickly hit it with some steam from an iron, let it sit for a few minutes then gave it one good burst of steam from the iron then applied some pressure from the iron to get all the wrinkles out. Came out a treat. Believe it not, the hardest part was putting it in the clear folder
« Last Edit: August 05, 2012, 01:08:37 pm by peterp »

Offline benzo

  • Pony
  • **
  • Posts: 27
Great Job
« Reply #10 on: April 02, 2011, 06:16:23 pm »
Awesome post, always enjoy flicking through detailed build threads like this. I couldn't help but laugh at all of the imperfections you illustrated on the initial paint job. Good work!

Offline a67-p51

  • Stallion
  • **
  • Posts: 94
  • When l get old l'll drive an auto.
  • Location: Geelong
  • Name: Frank
Great Job
« Reply #11 on: April 02, 2011, 10:52:51 pm »
Nice color good to see another vert and the co-worker.
cheers Frank.

Offline Macka

  • Shelby
  • *********
  • Posts: 6720
  • Vic member 1571
Great Job
« Reply #12 on: April 03, 2011, 09:19:54 pm »
Matt, that jobs coming along ok..

Offline Shermatt

  • Top Streeter
  • ******
  • Posts: 3529
Great Job
« Reply #13 on: April 03, 2011, 11:23:46 pm »
The painter is what is killing me macka. Apart from that, its coming along nicely.

Matt

Offline Chopper

  • Thoroughbred
  • **
  • Posts: 132
  • vic MOCA number 2177
Great Job
« Reply #14 on: April 11, 2011, 08:04:13 pm »
Quote from: rocket link=topic=14026.msg144018#msg144018

Good job Matt. Looks to be coming along nicely.

Was a bit confused at first seeing the Red colour on the car, but glad to see it is has been painted Lime Gold. Gorgeous colour!

Rocket.


You might remember this thread Rocket i was able to decide pretty quickly when i saw you lime gold mussy and the input all who contributed.
wont be long now.:yellowpepper:
Chopper

http://mustang.org.au/forum/viewthread.php?tid=10298


If life gives you lemons make lemonade

Offline waz_j

  • Pony
  • **
  • Posts: 42
Great Job
« Reply #15 on: April 11, 2011, 10:28:57 pm »
Hi Chopper,

I saw the Marti report you posted for the Green Machine.  My 68 S code that Matt and Sheri found was scheduled to be built on the same day as yours in the Metuchen factory.  Yours ended up being a week ahead of schedule and mine was built on the 29/11.

Funny after 40 years they were both in Matt's shop at the same time.

Cheers
Waz

Offline mwizz

  • Shelby
  • *********
  • Posts: 6281
  • MOCSA member #827
  • Location: Adelaide
  • Name: Mark
  • Car: 1969 Shelby GT500
Great Job
« Reply #16 on: April 12, 2011, 12:02:38 am »
Great pics Matt, you are certainly going the extra mile with this thread, well done

Offline Chopper

  • Thoroughbred
  • **
  • Posts: 132
  • vic MOCA number 2177
Great Job
« Reply #17 on: April 12, 2011, 11:06:52 am »
Quote from: waz_j link=topic=14026.msg144837#msg144837
Hi Chopper,

I saw the Marti report you posted for the Green Machine.  My 68 S code that Matt and Sheri found was scheduled to be built on the same day as yours in the Metuchen factory.  Yours ended up being a week ahead of schedule and mine was built on the 29/11.

Funny after 40 years they were both in Matt's shop at the same time.

Cheers
Waz


Also for reasons only known to Americans they were both painted RED at some stage.
Mine was delivered to a dealer in New York which may explain the lack of quality to previous work done.
i also saw on a vid that Matt did on your car that it was originally  Seafoam green colour there could not be to many 68 s code verts in that colour either.
When is your due to leave Florida Waz?
 
If life gives you lemons make lemonade

Offline waz_j

  • Pony
  • **
  • Posts: 42
Great Job
« Reply #18 on: April 12, 2011, 08:09:37 pm »
Resale red - they do love it over there :rol:

I don't think the Seafoam Green was a popular colour but I don't mind it. On a vert with the roof down and black interior I think it would have looked pretty good - not as good as the Lime Gold though :cool:

Mine's already in LA with Schumachers and due to be leaving on a slow boat this weekend.  Apparently it won't be here until the first week of June though which is 7 weeks and I was only expecting 3-4 on the water. Gives me more time to clean out the garage.

Your car is going to be spectacular when Matt finishes it - I'm looking forward to seeing the end product (bet you are too :smile01:)

Cheers
Waz

Offline Shermatt

  • Top Streeter
  • ******
  • Posts: 3529
Great Job
« Reply #19 on: April 13, 2011, 01:22:26 am »
Quote from: waz_j link=topic=14026.msg144837#msg144837
Hi Chopper,

I saw the Marti report you posted for the Green Machine.  My 68 S code that Matt and Sheri found was scheduled to be built on the same day as yours in the Metuchen factory.  Yours ended up being a week ahead of schedule and mine was built on the 29/11.

Funny after 40 years they were both in Matt's shop at the same time.

Cheers
Waz


Thats kinda cool. I wanted to look at both of those reports together to see how far apart they were...just didnt have time.....very cool indeed

Matt

Offline Shermatt

  • Top Streeter
  • ******
  • Posts: 3529
Great Job
« Reply #20 on: April 13, 2011, 01:25:52 am »
Ive allready had an offer on The green machine yesterday (im pretty sure he was joking).....I had a figure in my head but he offered/suggested $10,000 more than my figure.....Now Im happy

:cool:

Offline Shermatt

  • Top Streeter
  • ******
  • Posts: 3529
Great Job
« Reply #21 on: April 13, 2011, 01:27:01 am »
Im just trying to make a few posts so it goes to page 2 so it doesnt take as long to load for anyone with dial up

Offline Shermatt

  • Top Streeter
  • ******
  • Posts: 3529
Great Job
« Reply #22 on: April 13, 2011, 01:27:51 am »
still one page one

Offline Shermatt

  • Top Streeter
  • ******
  • Posts: 3529
Great Job
« Reply #23 on: April 13, 2011, 01:28:43 am »
Part 6   “Walk of the Shebangie”
Been pretty busy since the last post so I haven’t had a chance to post any updates. We got the new brake booster and master cylinder painted up, ran all the fuel and brake lines, Mike repaired the engine bay loom and re-wrapped it. Got the dash all painted along with the doors. All the internals of the door where blasted and primed. Rebuilt the entire heater box balsting all the little bits that where steel.


Got the brake booster and steering column blasted and fitted (had to repaint it twice as I scratched the bugger) Damn rag joint was a pain in the A55, was late on Friday and I had already opened the bag with all the rag joint bolts and the pie shaped washers from the old one so I zip locked them into a bag and taped them to the steering colomn…do you think I find them yesterday…tottaly forgot where I had put them…walked around for 3 hours looking for them….Sheri finally found them.


Finally got the new electric motor fitted and ran all the lines. I had come in on a Sunday several months back and blasted the convertible top frame, primed it, then painted it a nice satin flat black. Was very happy with how it came up actually. There wasn’t any pitting in the frame anywhere. Came up really nice.


Now for the final fitment of the convertible top.
Just for shi7s and giggles we through it on for a larf


Here is a quick tip if your fitting new front bar brackets that are those Taiwanese jobbies, you have to grind down the tips at the front where there rolled and the bumper fits too. I hope you can the difference in the photo below. Im pretty sure the one on the left I have already grinded down and rounded the edges.


Apart from that, this is where we are at today. A lot more blasting and painting. Get all the brakes bled today before the engine goes in incase of any leaks or what ever. Going to use DOT 5 silicone brake fluid. Kinda pricey but won’t eat your paint if there is a leak. Piant the handbrake components and get that all plumed up aswell. Really don’t want to have mess with anything once the engine goes in.

Will try and get some more pics today (when I can post them is a different story though but I will do my best)

Matt
« Last Edit: August 05, 2012, 01:09:45 pm by peterp »

Offline Shermatt

  • Top Streeter
  • ******
  • Posts: 3529
Great Job
« Reply #24 on: April 13, 2011, 08:02:04 pm »
Have a question for everyone.

I spoke to john early this morning in regards to wheels. At present we have a set of 12 slot style wheels that we fitted quickly yesterday for a look and it really brings the car down in WOW factor. They look similar to this one (ours dont look this good)


I was wondering what your opinions would be on a good wheel for the car. I was thinking a nice set of magnum 500's would really set the car off


Anyone have any opinions on this wheel or another that would set it off?

I told John that I would leave it up to you all as he would like some feedback

The other question is, what would you rather have on the car in the way of an exhaust, a transverse set up with just one muffler or a twin system set up with 2 mufflers?

Your thoughts are appreciated

Matt
« Last Edit: August 05, 2012, 01:10:08 pm by peterp »